

Quick Start (5 Mins)
Welcome to API Now! In this 5-minute tutorial, you will build, secure, and deploy a complete, production-ready Task Manager API from scratch—without writing a single line of code.
By the end of this guide, you will have a live PostgreSQL database, automatic user authentication with JWT sessions, role-based access control (RBAC), and fully secured CRUD endpoints ready to connect to any frontend (such as Bubble, FlutterFlow, Webflow, Zapier, or custom code).
The Workflow Overview
Section titled “The Workflow Overview”Backend development in API Now! follows a simple, visual 2-step journey from blueprint to live API:
flowchart LR
    Step1["<b>Step 1: Data Modeler</b><br/>• Define Entities & Fields<br/>• Attach Data Semantics<br/>• Commit & Publish Domain"]
    --> Step2["<b>Step 2: API Modeler</b><br/>• Select Published Domain<br/>• Configure Auth & Session<br/>• Expose Actions & Access Rules<br/>• One-Click Deploy"]
    --> Step3["<b>Step 3: Live API & Portal</b><br/>• Live PostgreSQL Database<br/>• REST API & Interactive Docs"]
- The Data Modeler (The Blueprint): You define your business records (
UserandTask), attach semantic modules that automate backend validation and security, and publish your domain to the Data Catalog. - The API Modeler (The Gateway): You select your published domain, set up authentication and session handling, expose CRUD actions, configure access scenarios, and deploy your live API with one click.
- The Live API & Portal: The serverless runtime provisions your database, generates live REST endpoints, and provides an interactive API Portal for testing.
Step 1: Build & Publish Your Data Blueprint
Section titled “Step 1: Build & Publish Your Data Blueprint”First, let’s create a new Data Domain, define our User and Task entities with Data Semantics, and publish the domain so it is ready to power an API.
1. Create a New Domain Model
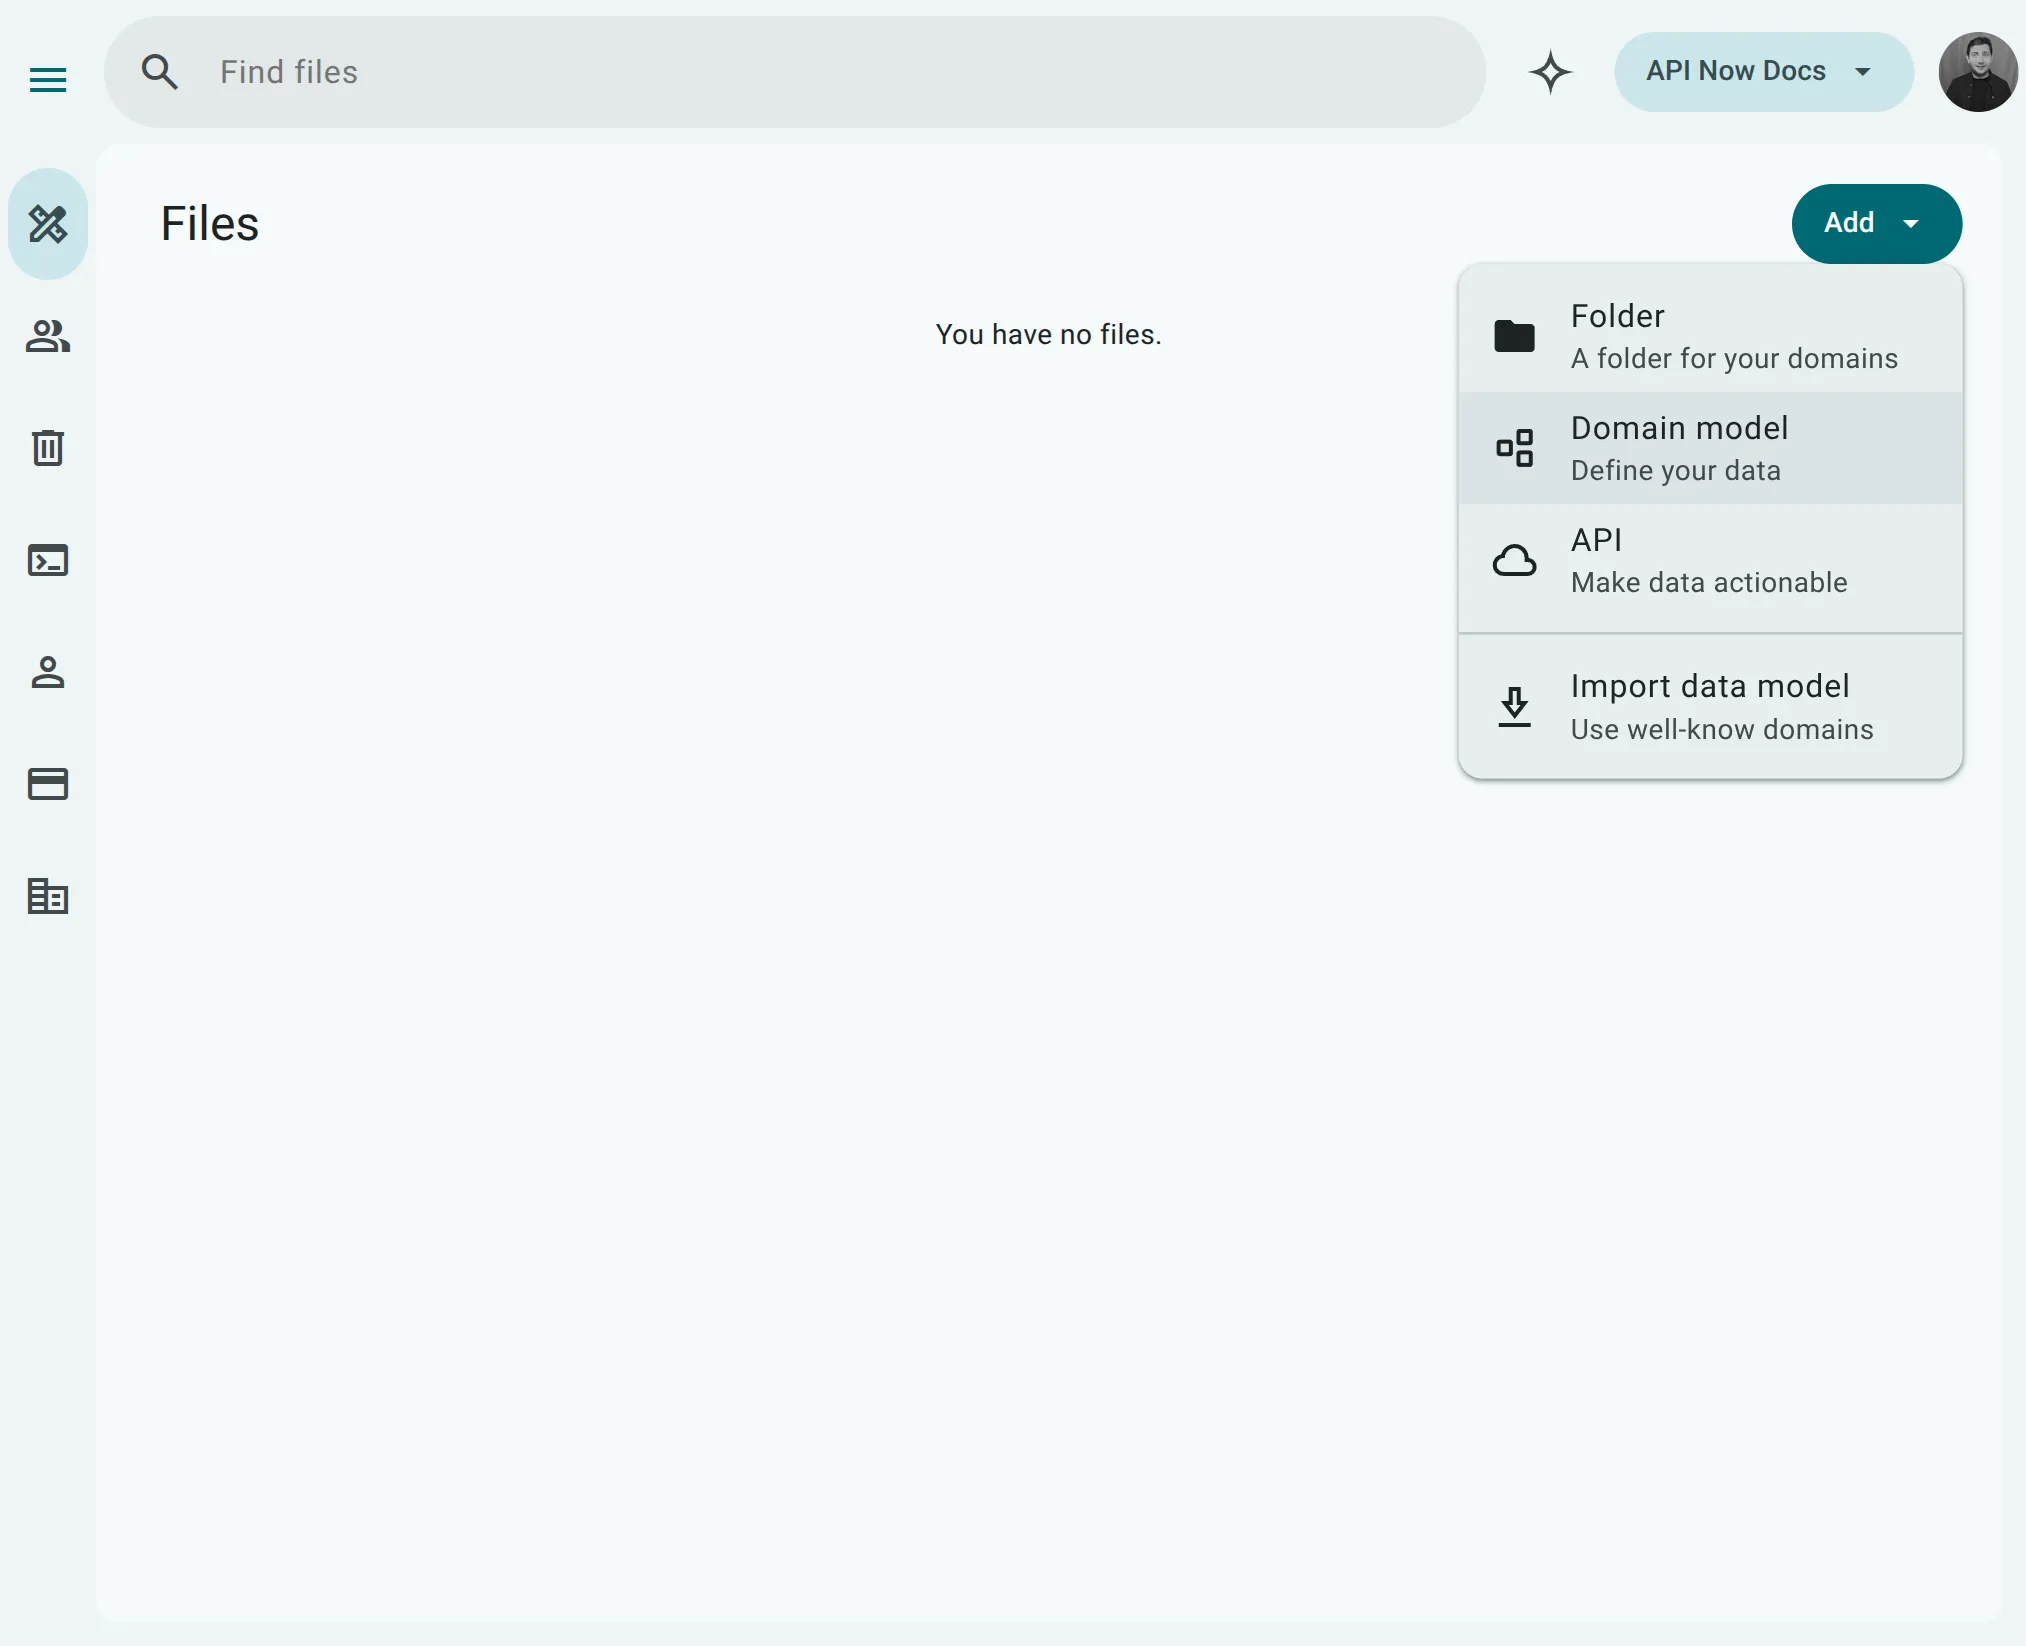
Section titled “1. Create a New Domain Model”- Open the platform at app.apinow.app. From the main workspace screen (Files), click the Add button in the top right.
- Select Domain model (Define your data).
- Name your file
Task Managerand open it.
2. Create the Tasks Data Model
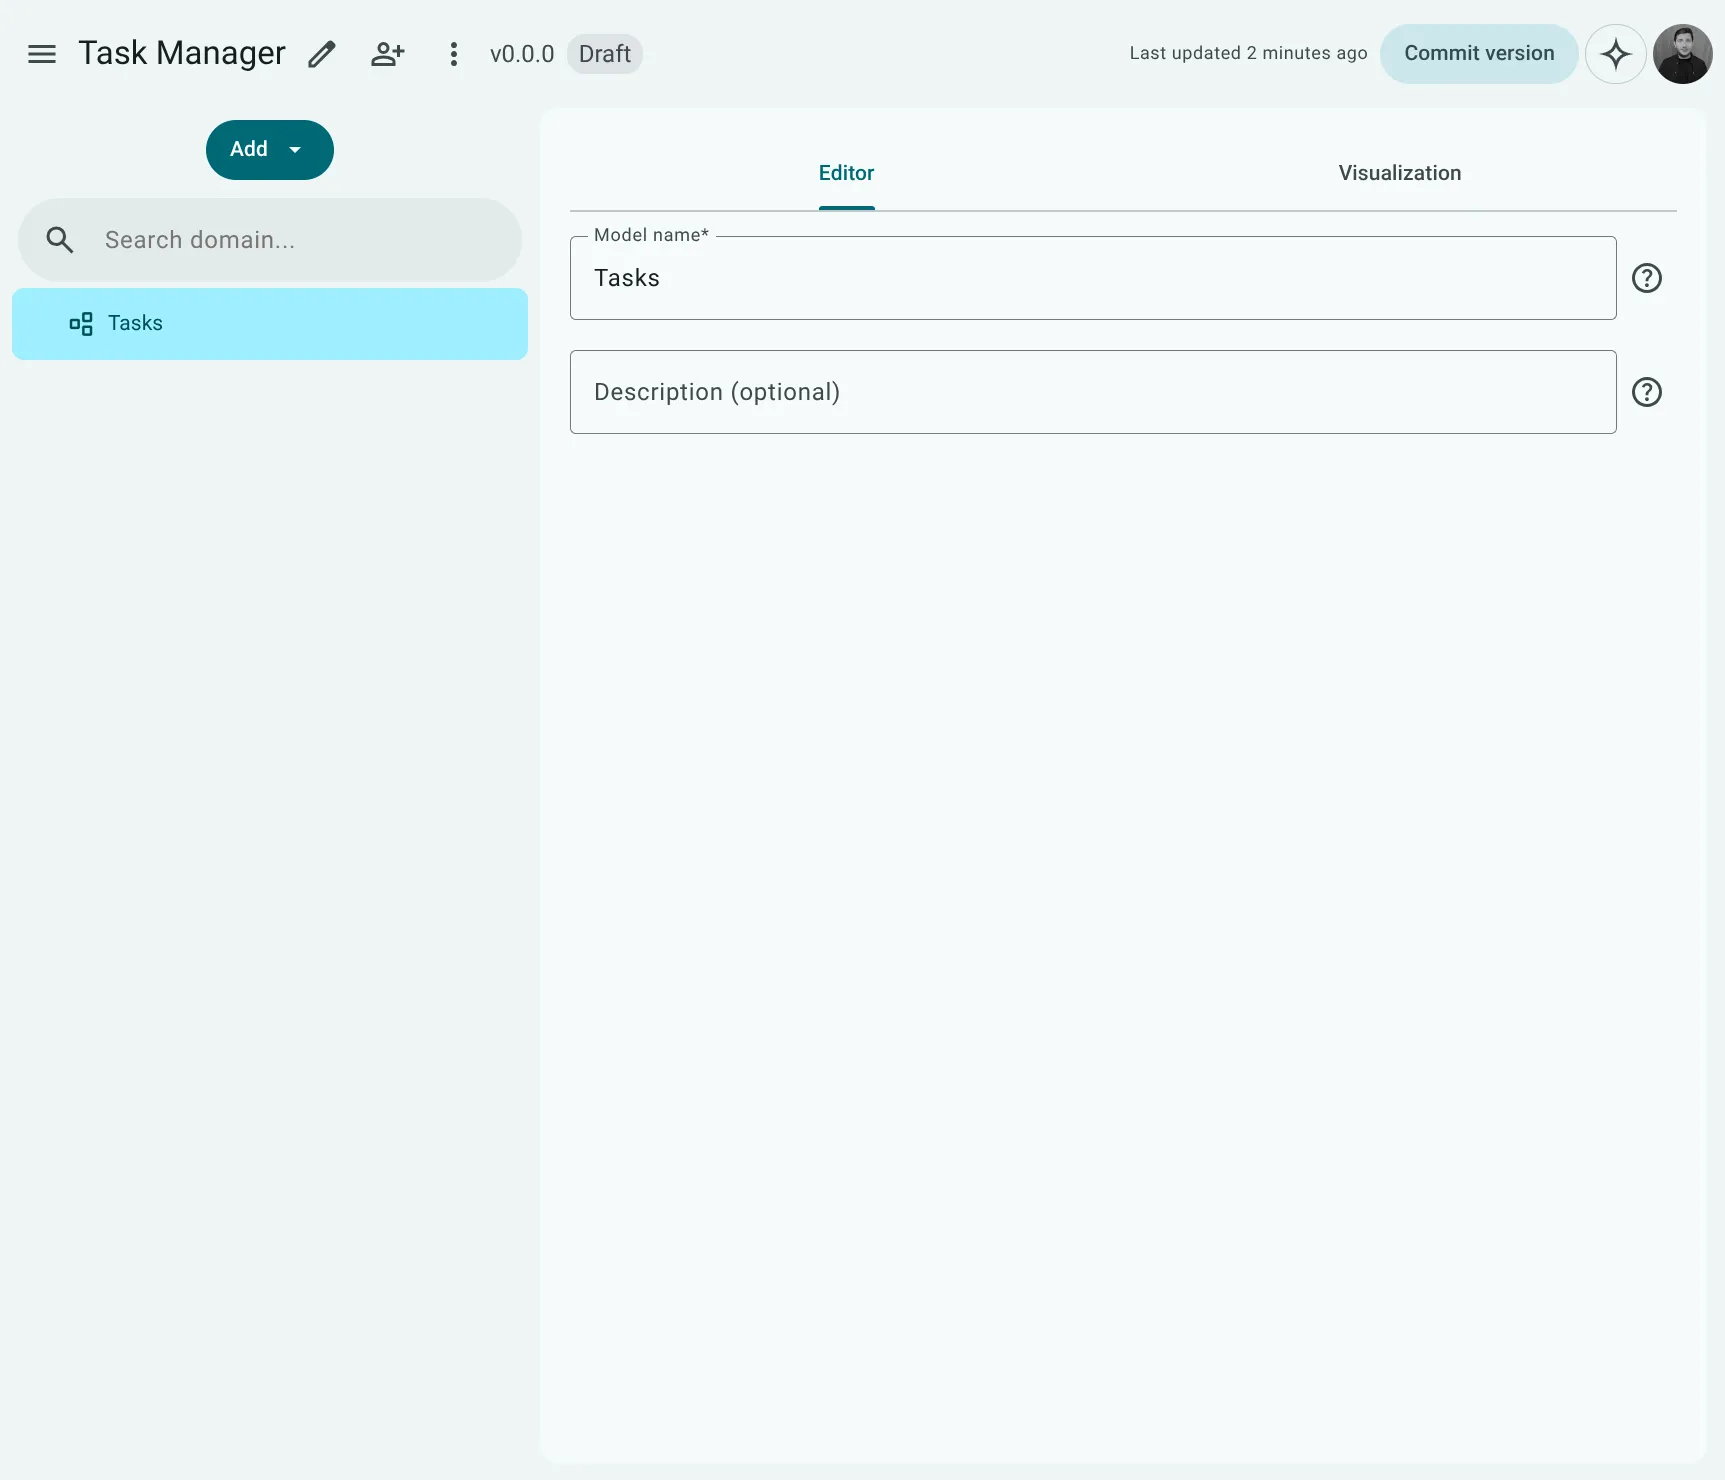
Section titled “2. Create the Tasks Data Model”- In the left navigation panel, click Add and select Data Model.
- Set the Model name to
Tasks.
3. Create the User Entity
Section titled “3. Create the User Entity”- Right-click the
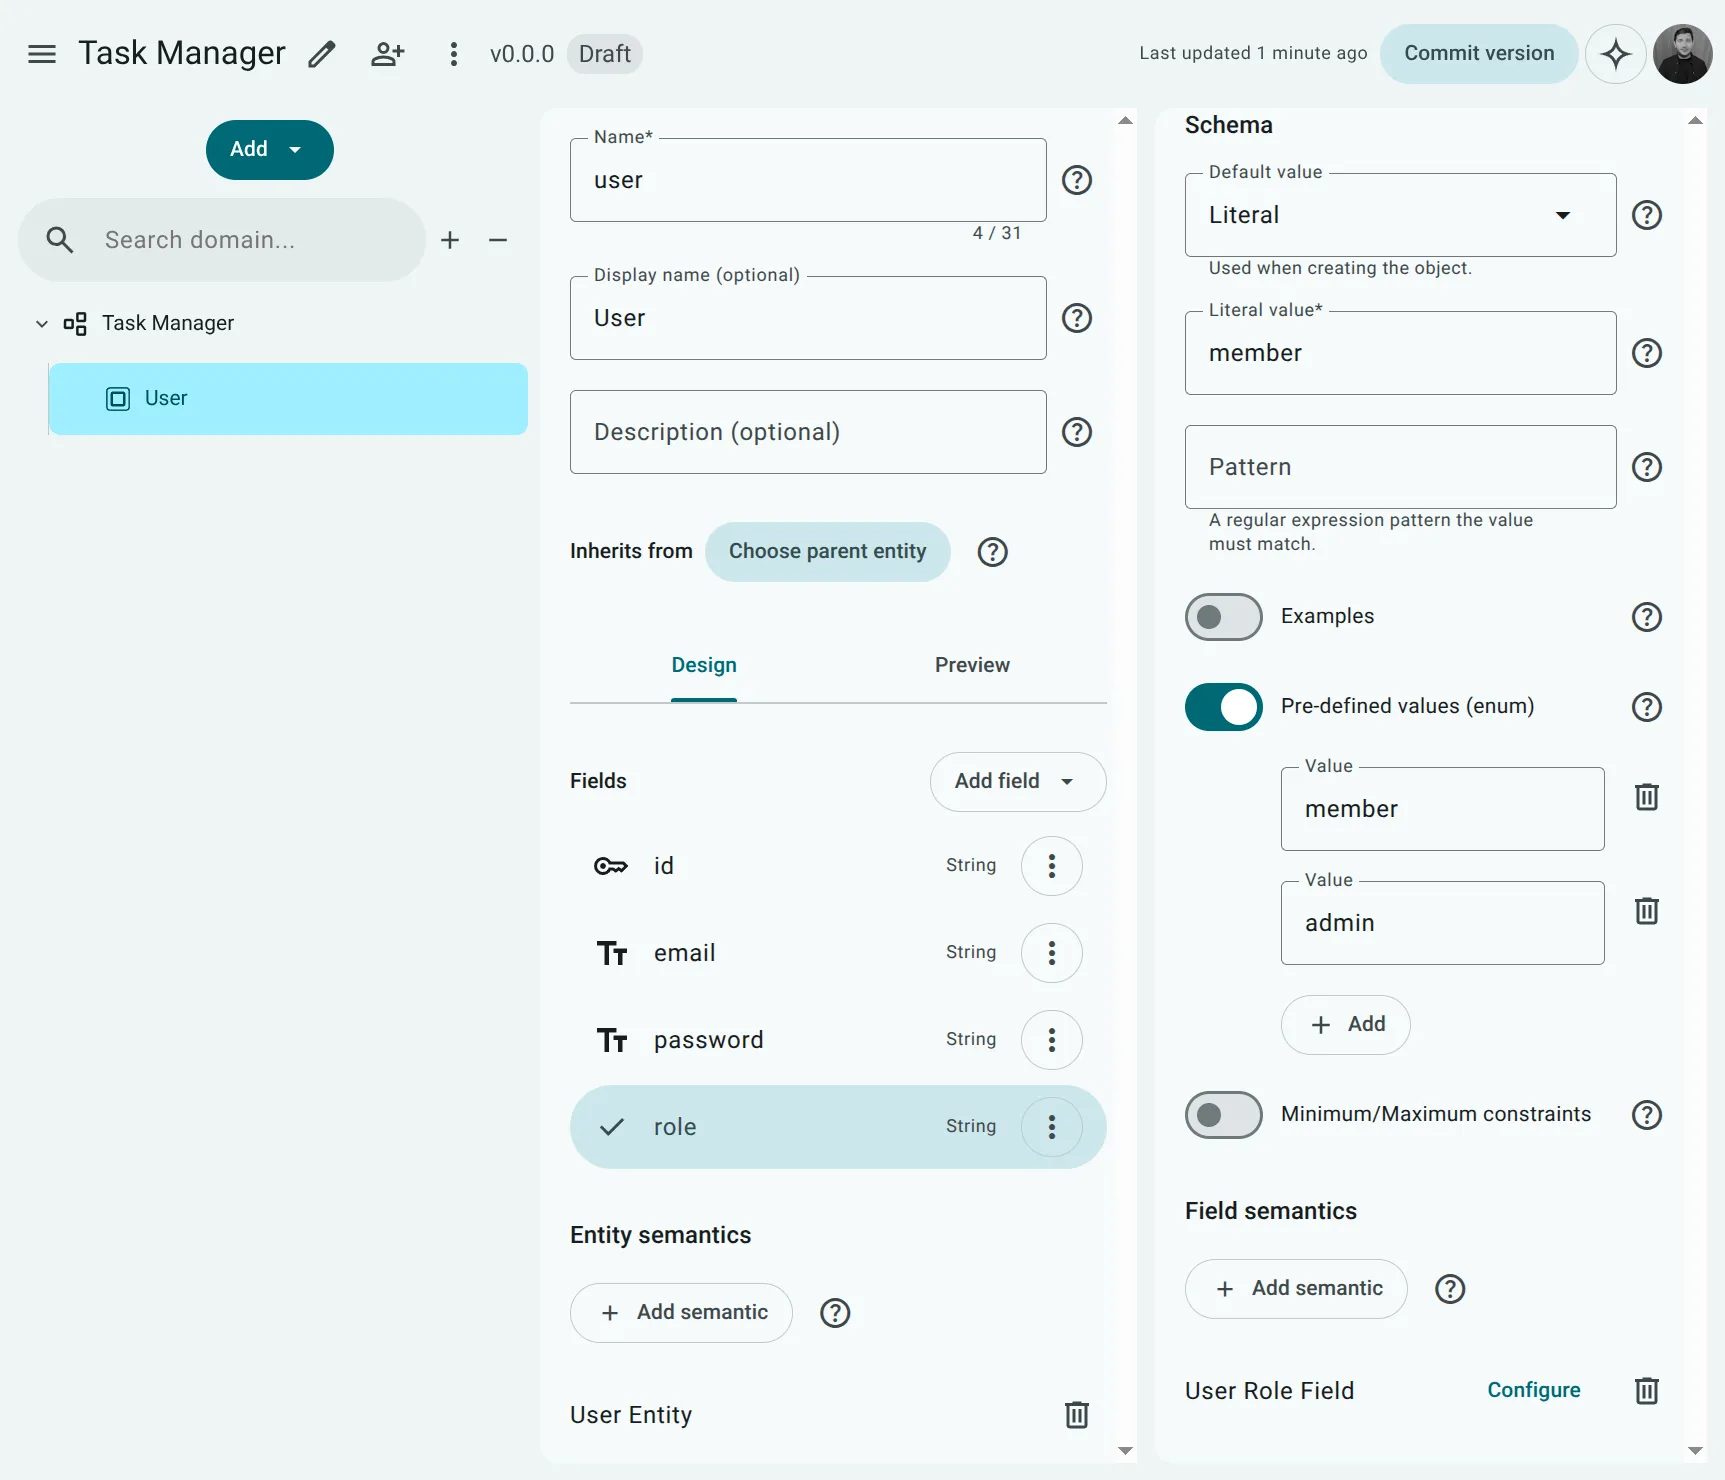
Tasksdata model in the navigation panel and select New Entity. - Set the Name to
userand the Display name toUser. - Under Entity semantics, click + Add semantic and select the
User Entitysemantic module. - Add the following fields under the Fields section:
id: TypeString, check Identifier.email: TypeString, check Required and Index. Under Field semantics, click + Add semantic and apply bothEmailandUsername.password: TypeString, check Required and Write Only. Under Field semantics, applyUser Password.role: TypeString. Toggle on Pre-defined values (enum) and add two values:memberandadmin. Set the Default value toLiteralwith valuemember. Under Field semantics, applyUser Role Field.
4. Create the Task Entity
Section titled “4. Create the Task Entity”- Right-click the
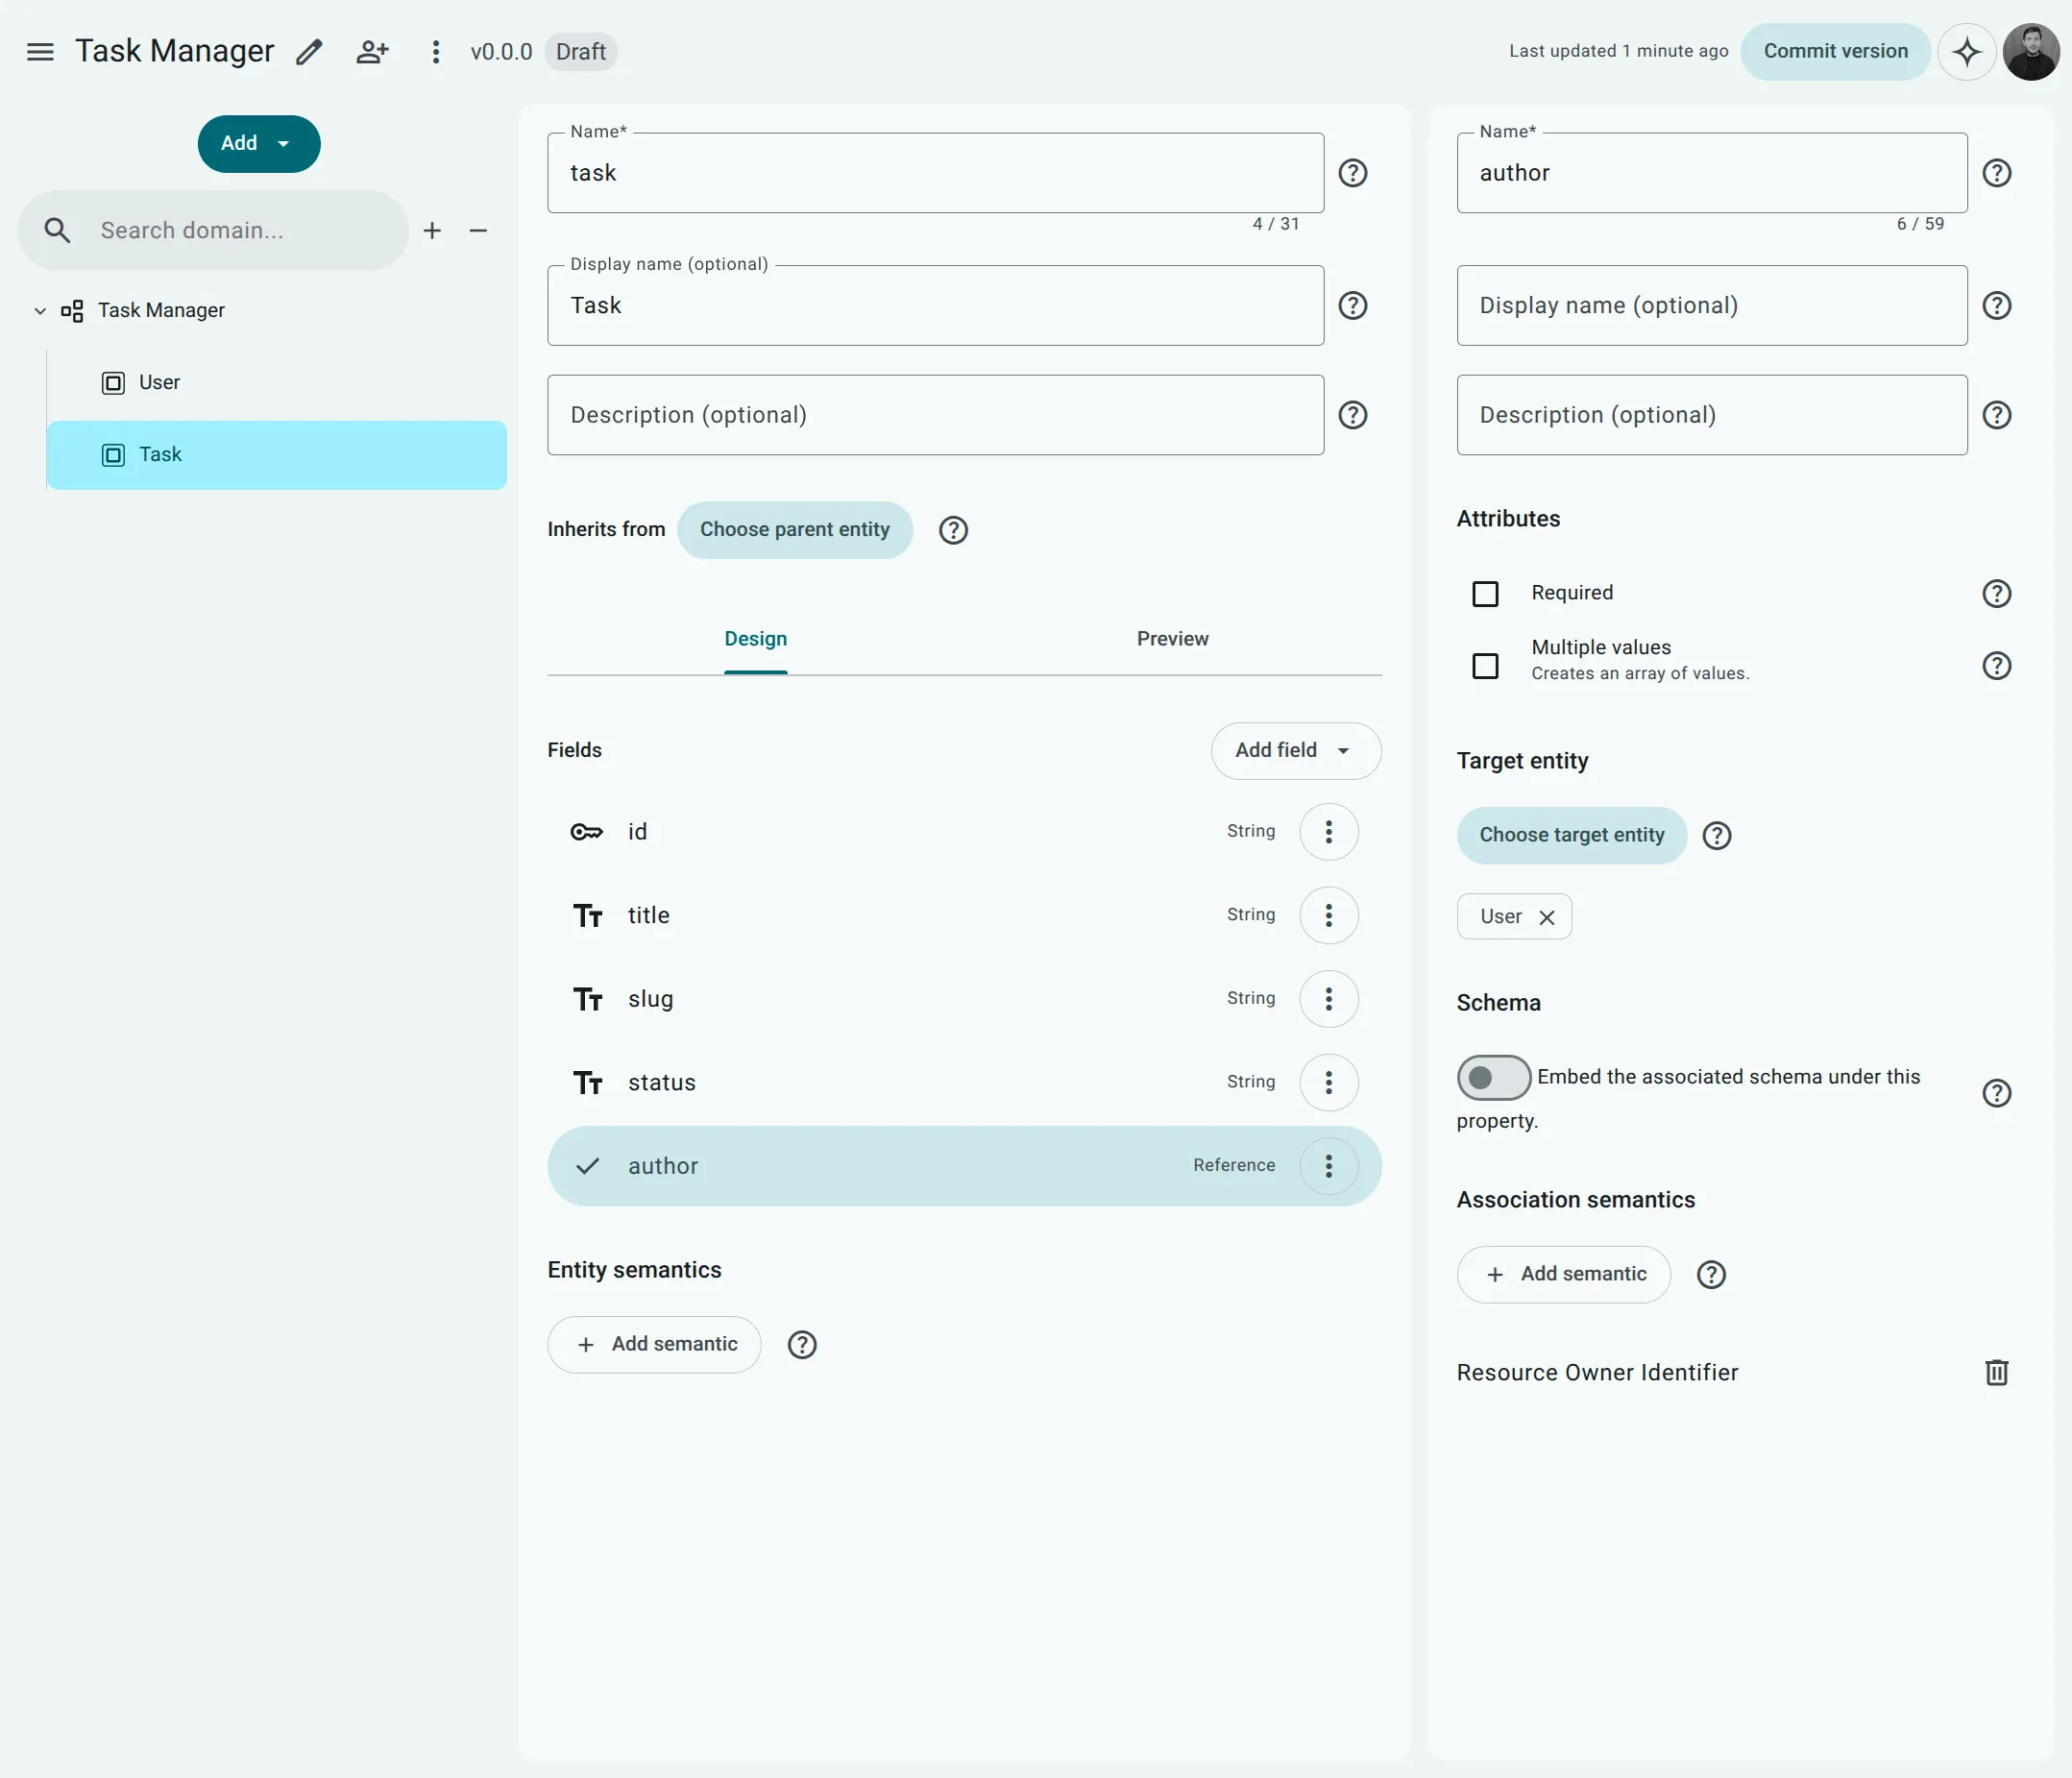
Tasksdata model in the navigation panel and select New Entity. - Set the Name to
taskand the Display name toTask. - Add the following standard properties by clicking Add field > Property:
id: TypeString, check Identifier.title: TypeString, check Required. Under Field semantics, applyRecord Title.slug: TypeString, check Required. Under Field semantics, applyPublic Unique Name(automatically auto-generates URL slugs from the title).status: TypeString, check Required and Index. Toggle on Pre-defined values (enum) and addpending,in_progress, andcompleted. Set the Default value toLiteralwith valuepending. Under Field semantics, applyStatus.
- Add the relationship to the User entity by clicking Add field > Reference:
- Name:
author - Under Target entity, click Choose target entity and select the
Userentity from your data model. - Under Association semantics, click + Add semantic and apply
Resource Owner Identifier.
- Name:
5. Commit and Publish the Data Domain
Section titled “5. Commit and Publish the Data Domain”Before connecting your data to an API, you must publish the domain so it is locked, versioned, and cataloged.
- Click Commit version in the top-right toolbar.
- In the confirmation dialog, verify the version name is
1.0.0and click Save. - Once committed, the button changes to Publish. Click Publish.
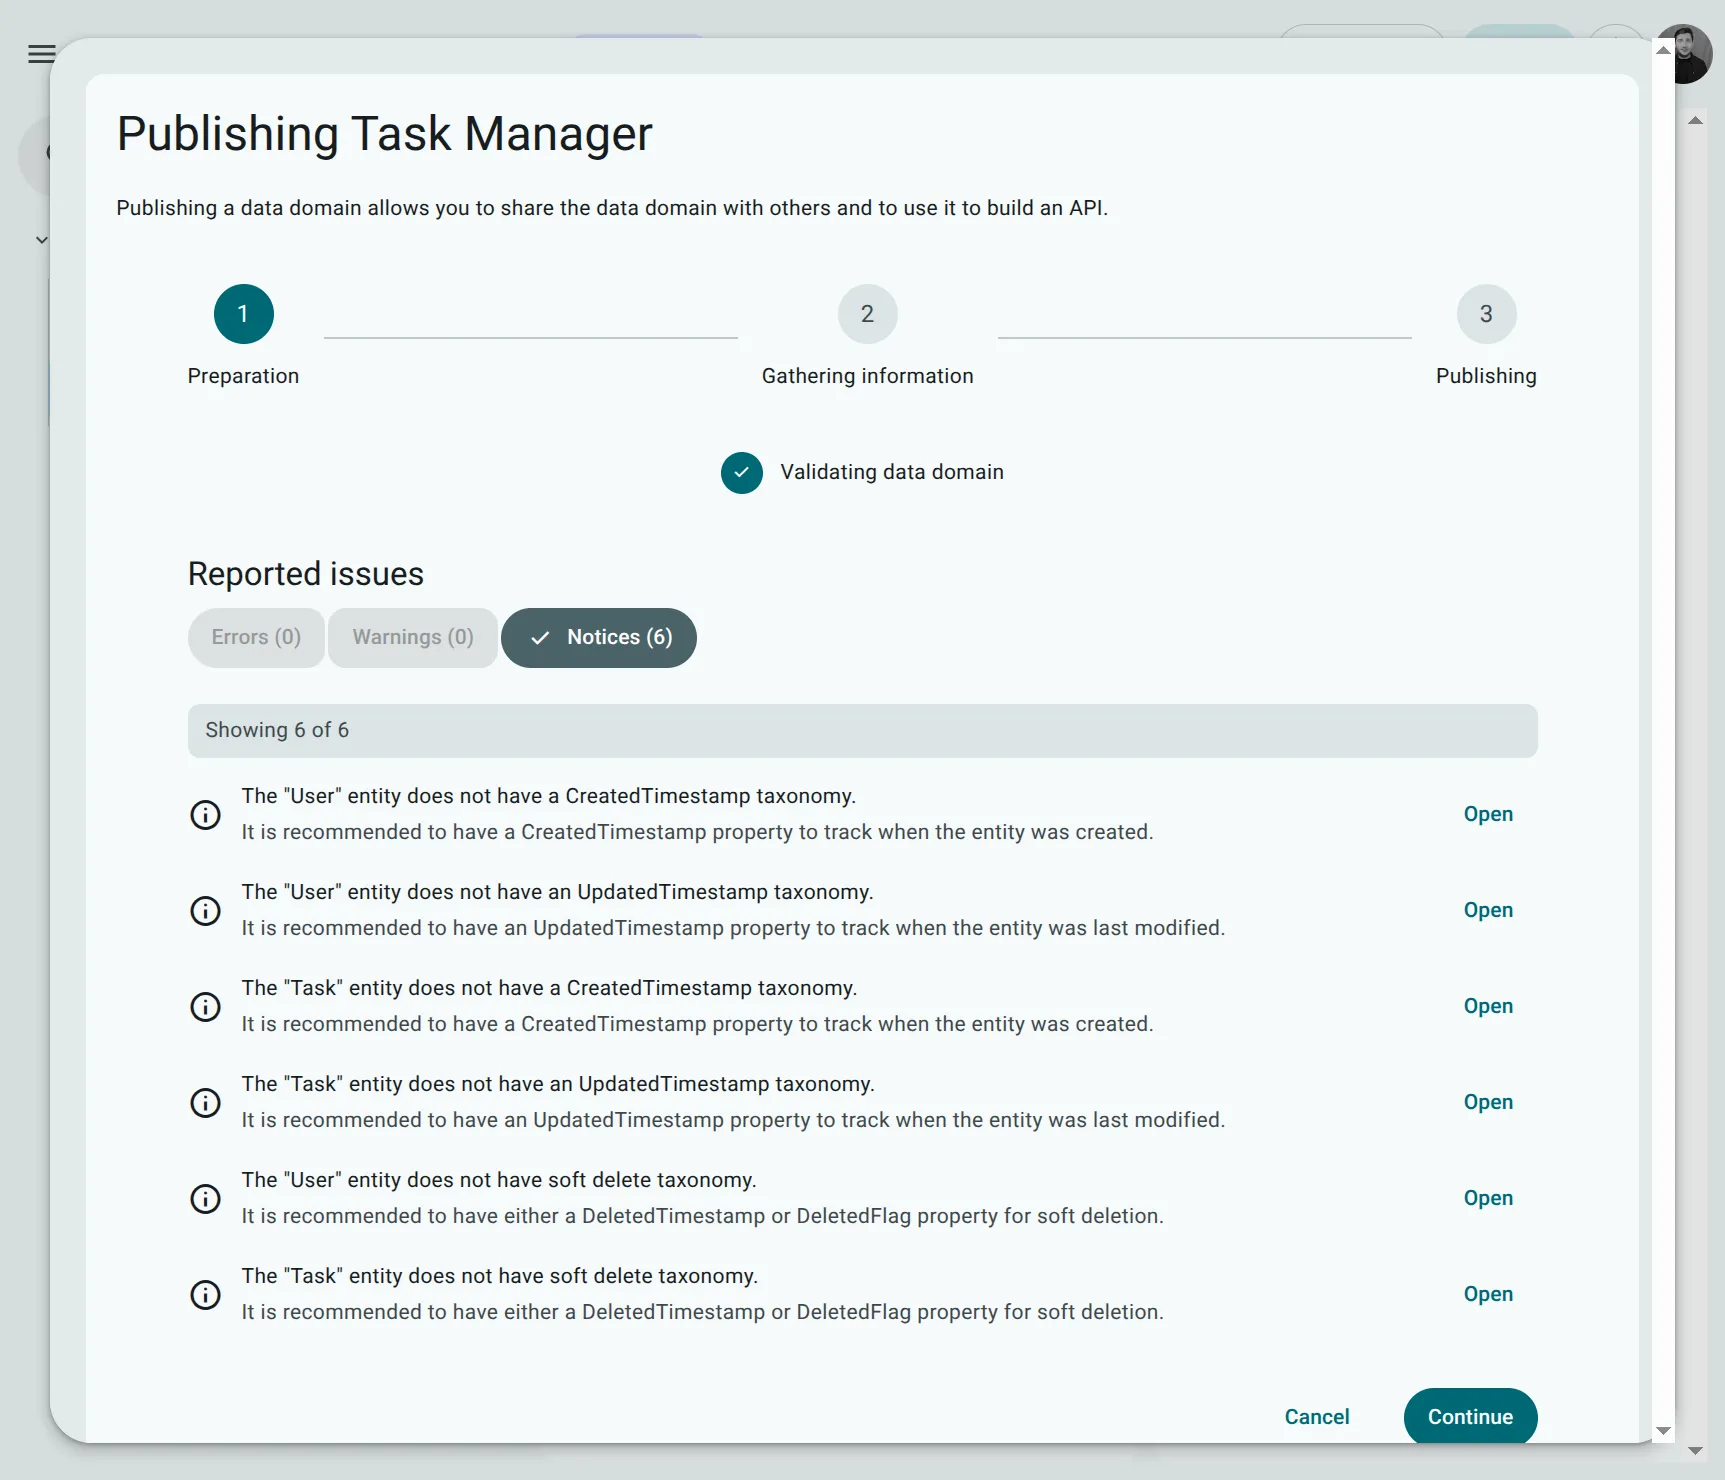
- Step 1: Preparation (Validation): A modal appears validating your domain schema. You will see info-level notices (e.g. recommendations for timestamp taxonomies or soft deletion). Because there are no blocking errors, click Continue.
- Step 2: Gathering Information: Keep the default settings (
Listing title:Task Manager,Version name:1.0.0,Visibility:public,Lifecycle:Stable), and enter a Listing description such as"My first data domain".
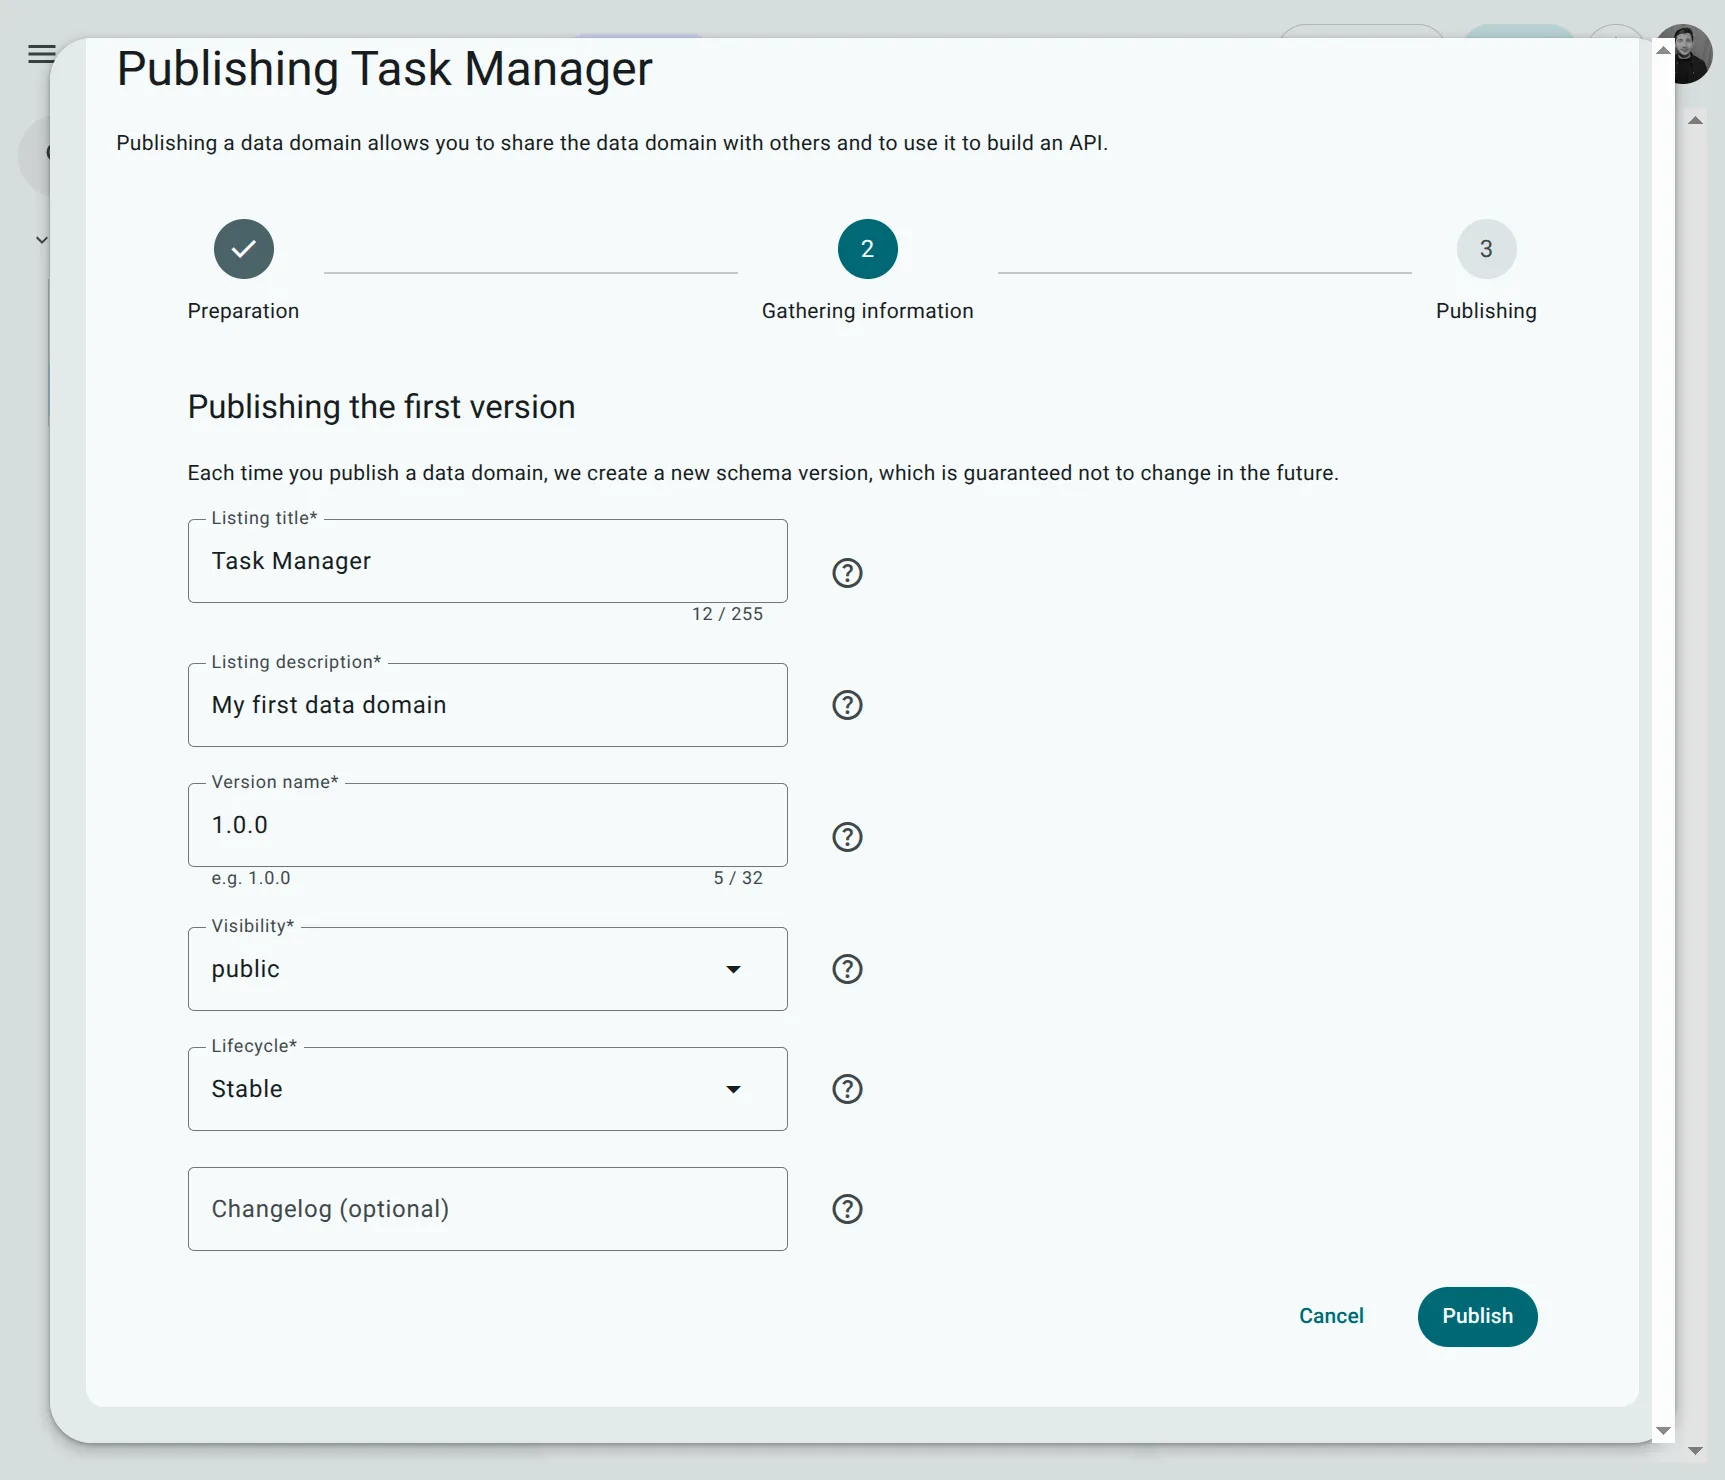
- Click Publish. In a few seconds, you will see a confirmation message: “Your data domain was published”.
Step 2: Create & Configure Your API Model
Section titled “Step 2: Create & Configure Your API Model”Now that your data blueprint is published in the catalog, let’s create the API model that will expose secure endpoints to the outside world.
1. Create a New API File
Section titled “1. Create a New API File”- Return to the main Files screen.
- Click Add in the top right and select API (Make data actionable).
- Name your file
Task Manager APIand open it.
2. Select Your Published Data Domain
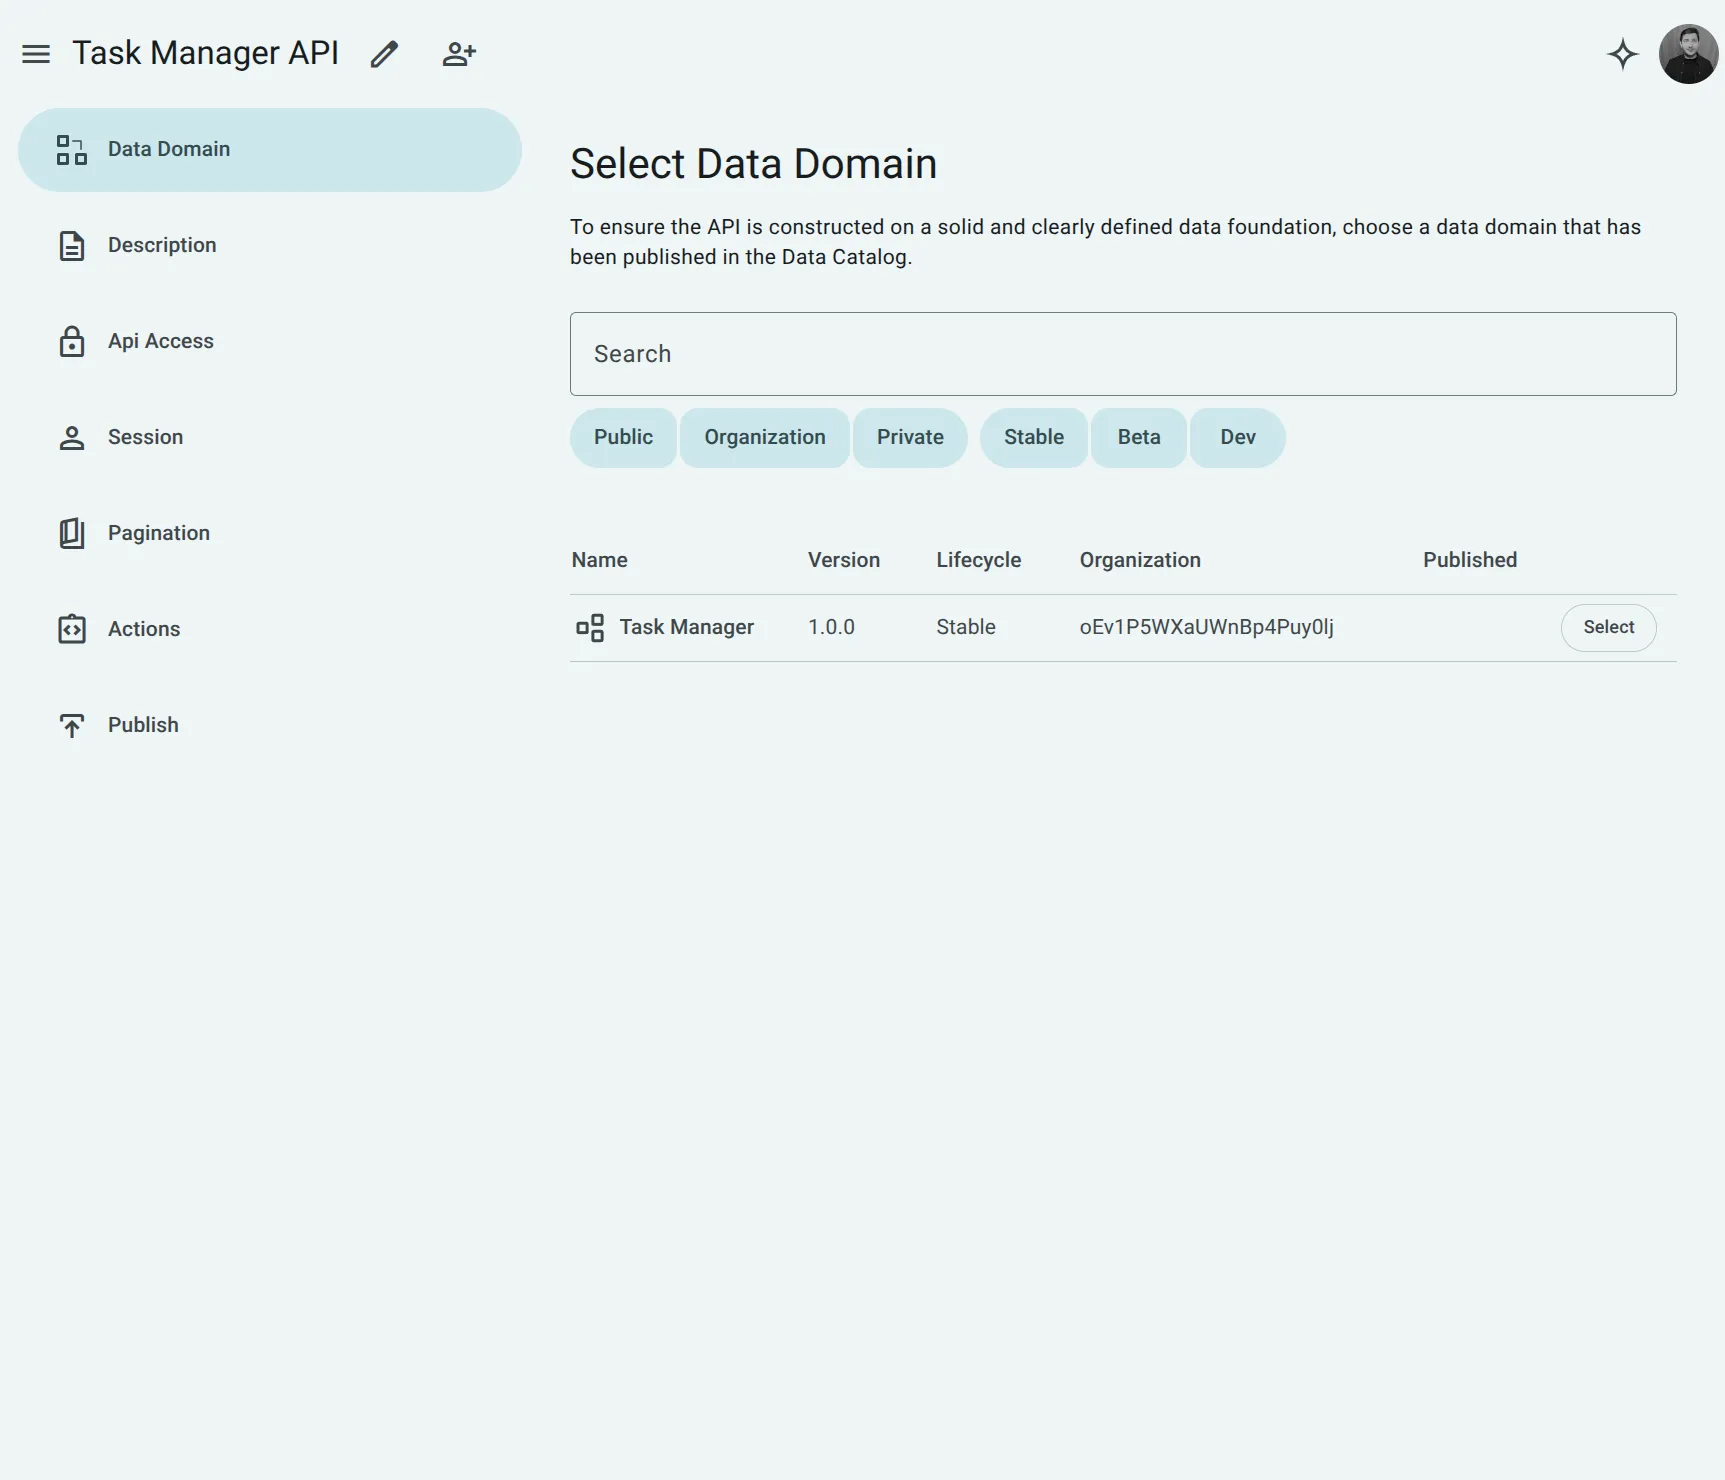
Section titled “2. Select Your Published Data Domain”In the first step (Data Domain), the catalog displays your available domains:
- Locate the Task Manager domain (Version
1.0.0, LifecycleStable) you published in Step 1. - Click Select to attach it to your API.
3. Configure API Description & Version
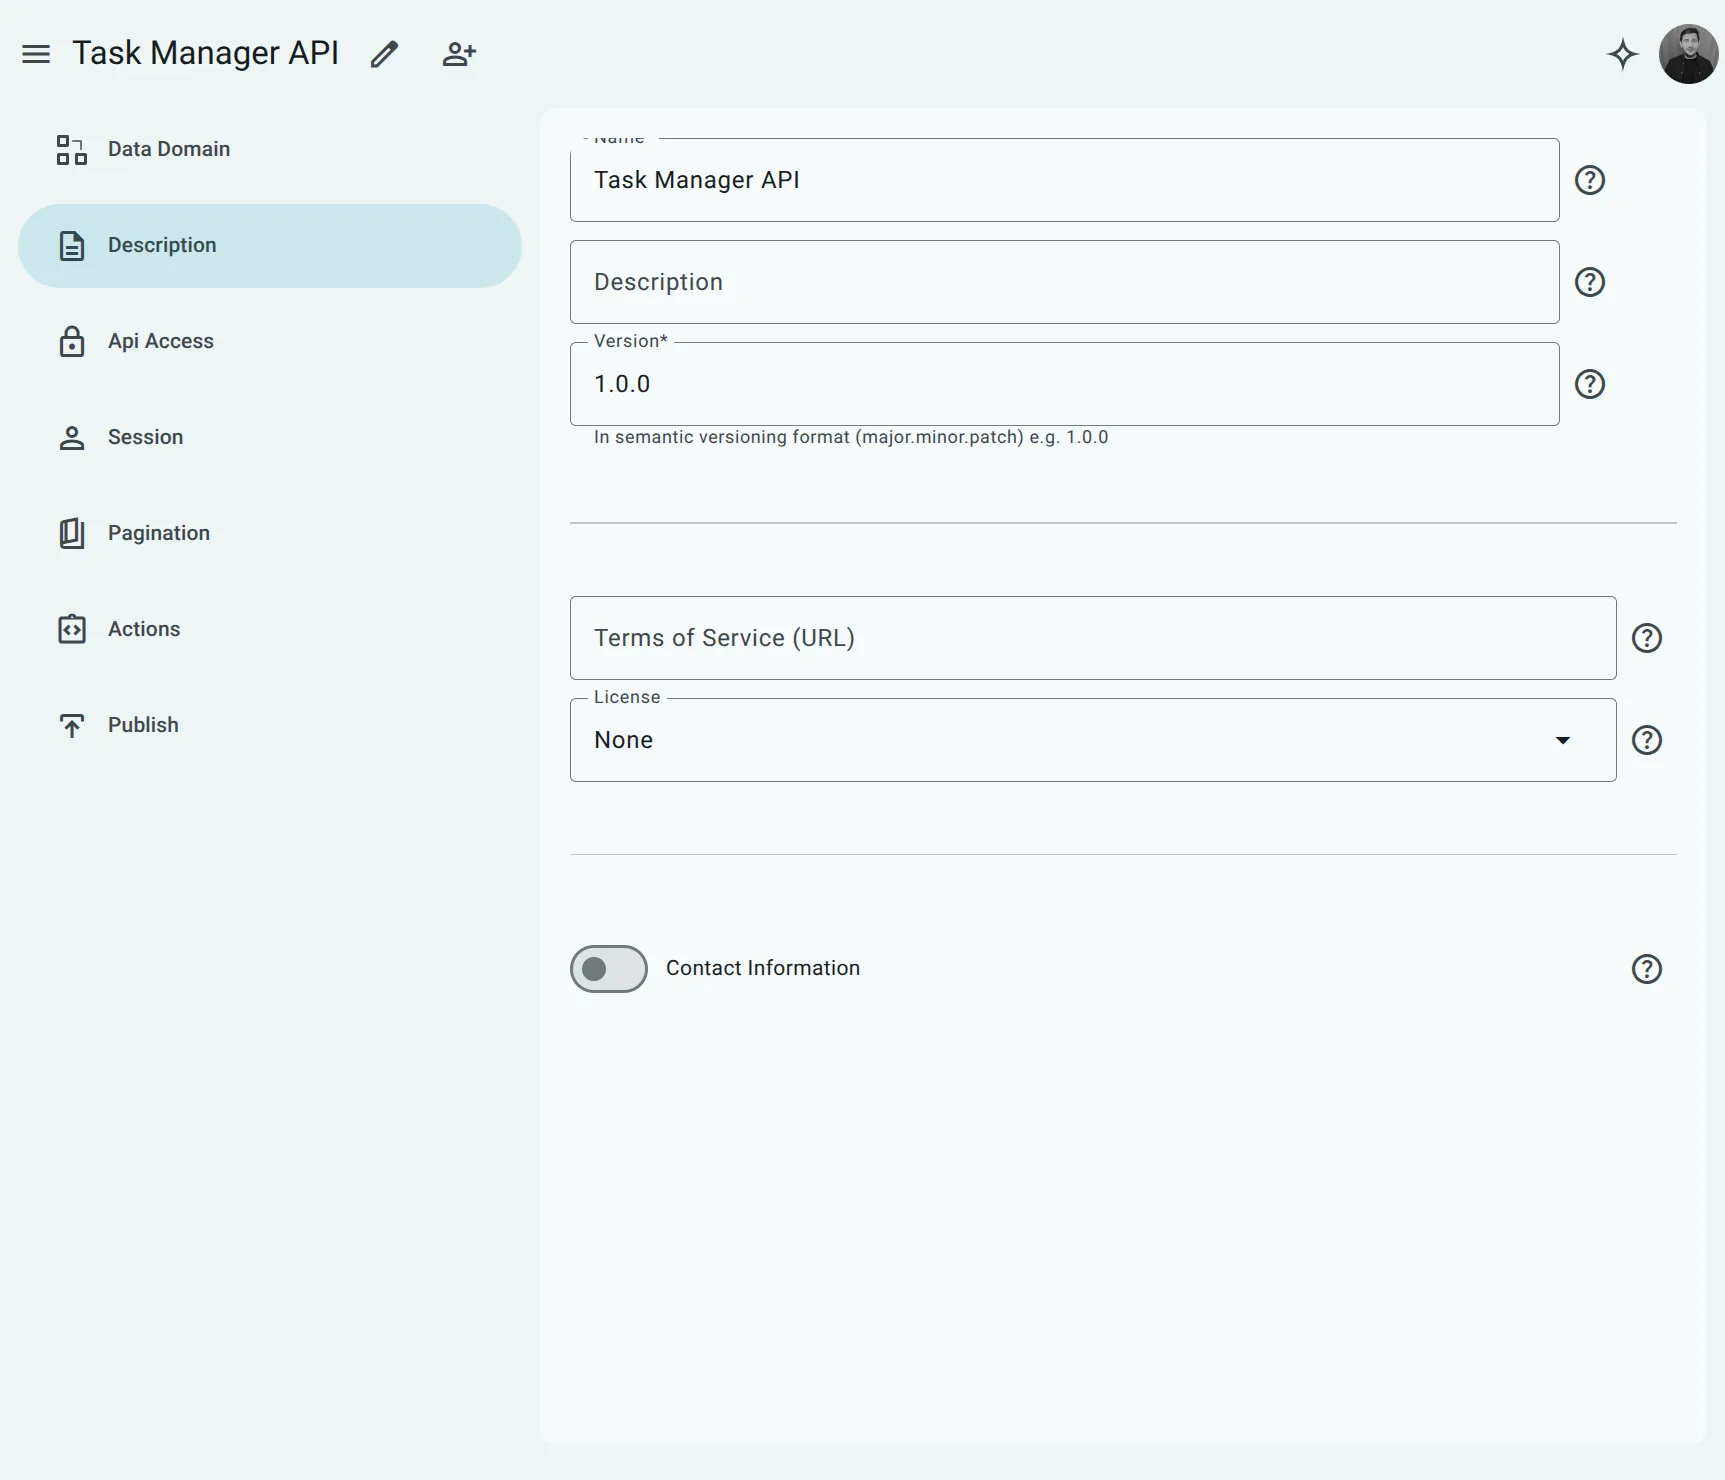
Section titled “3. Configure API Description & Version”- Click Description in the left navigation sidebar.
- Under Version*, enter
1.0.0. - You can leave the optional description, terms, and license fields as defaults.
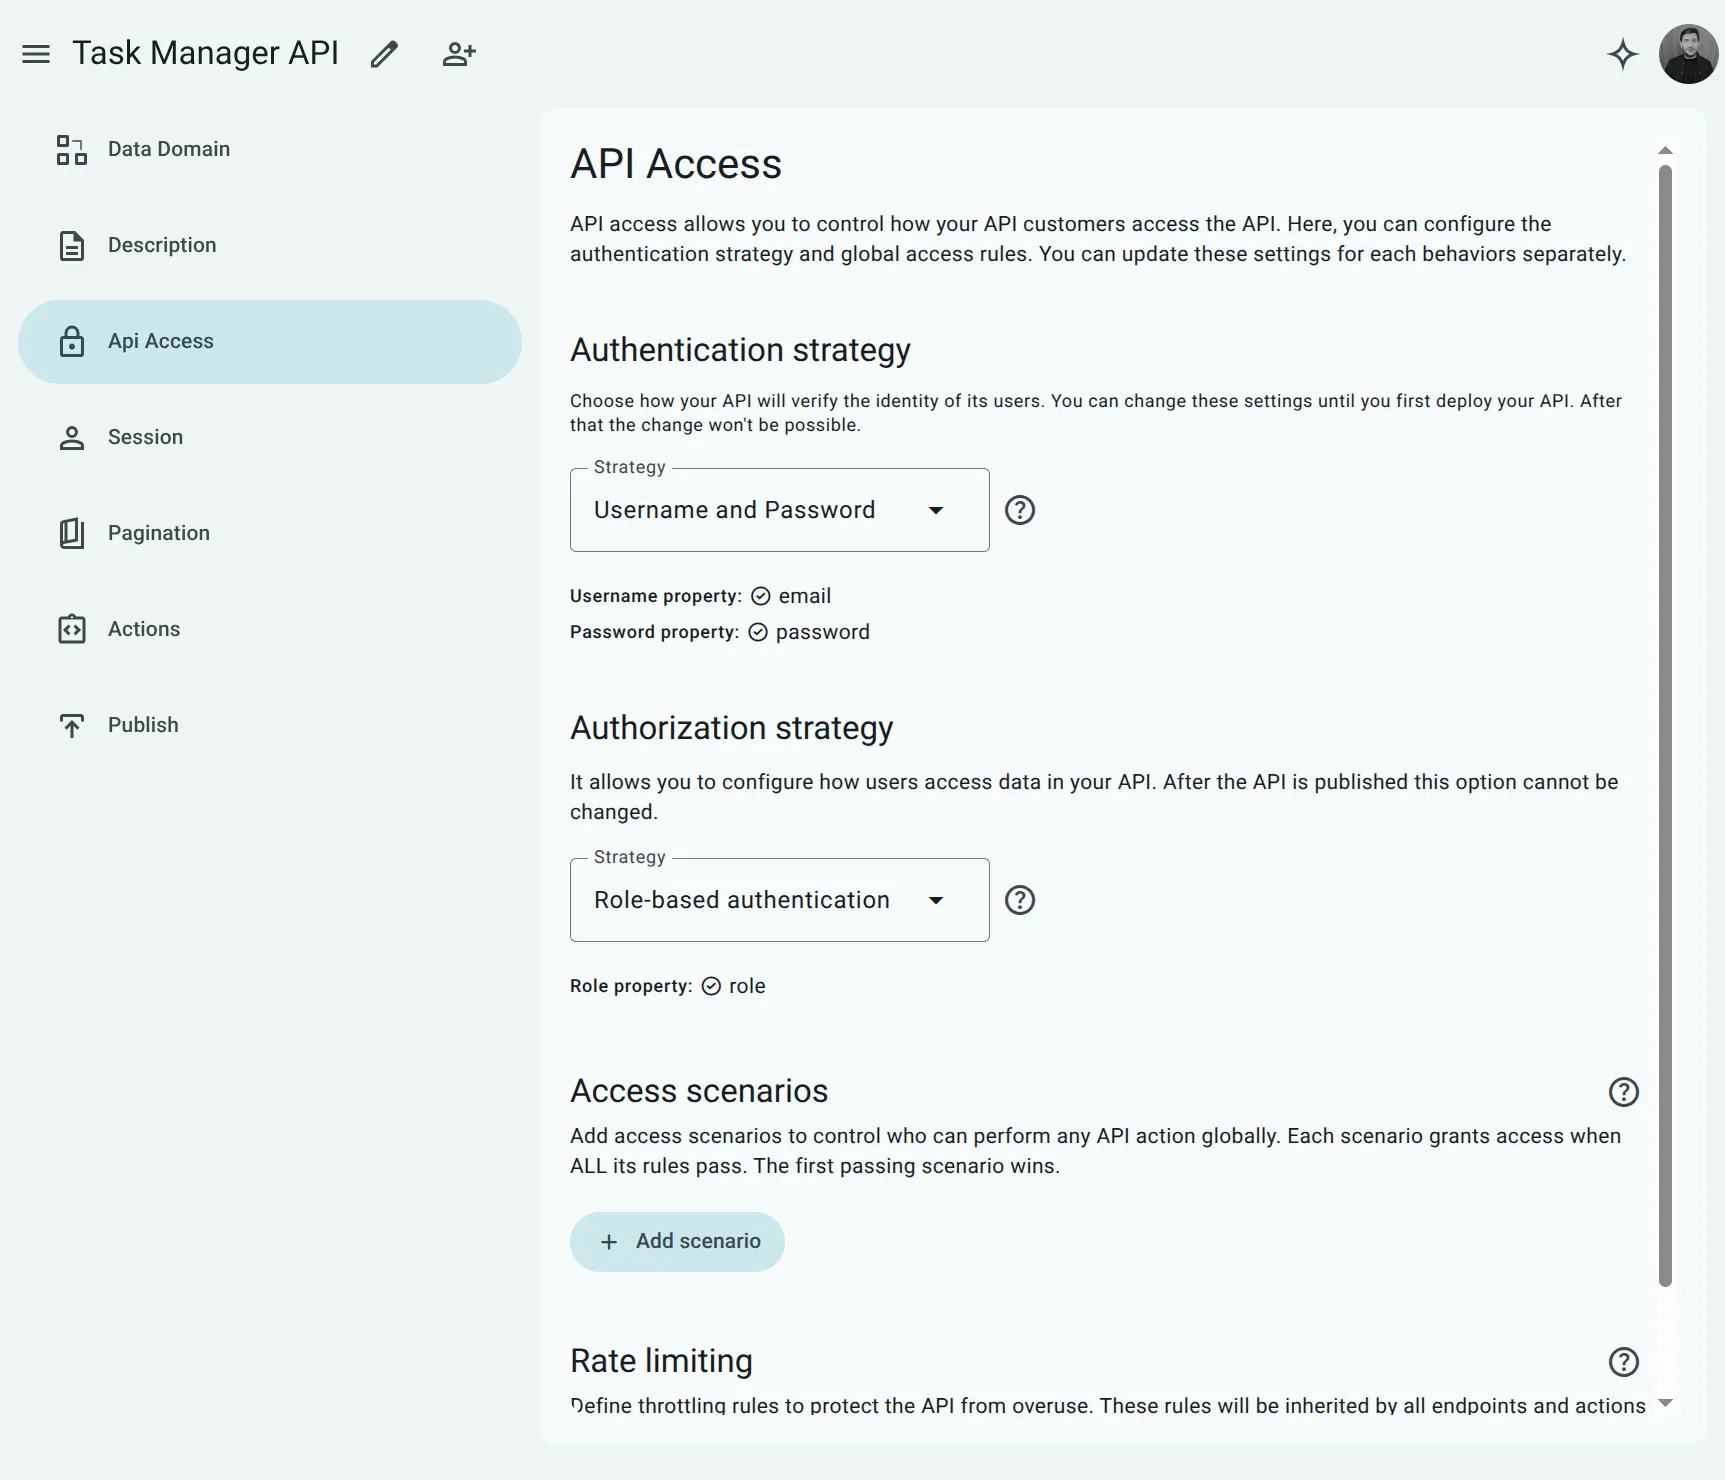
4. Set Authentication & Authorization Strategies
Section titled “4. Set Authentication & Authorization Strategies”- Click API Access in the left navigation sidebar.
- Keep the default Authentication strategy set to Username and Password (it automatically detects
emailas the username property andpasswordas the password property). - Keep the default Authorization strategy set to Role-based authentication (it automatically detects
roleas the role property).
5. Review Session Configuration
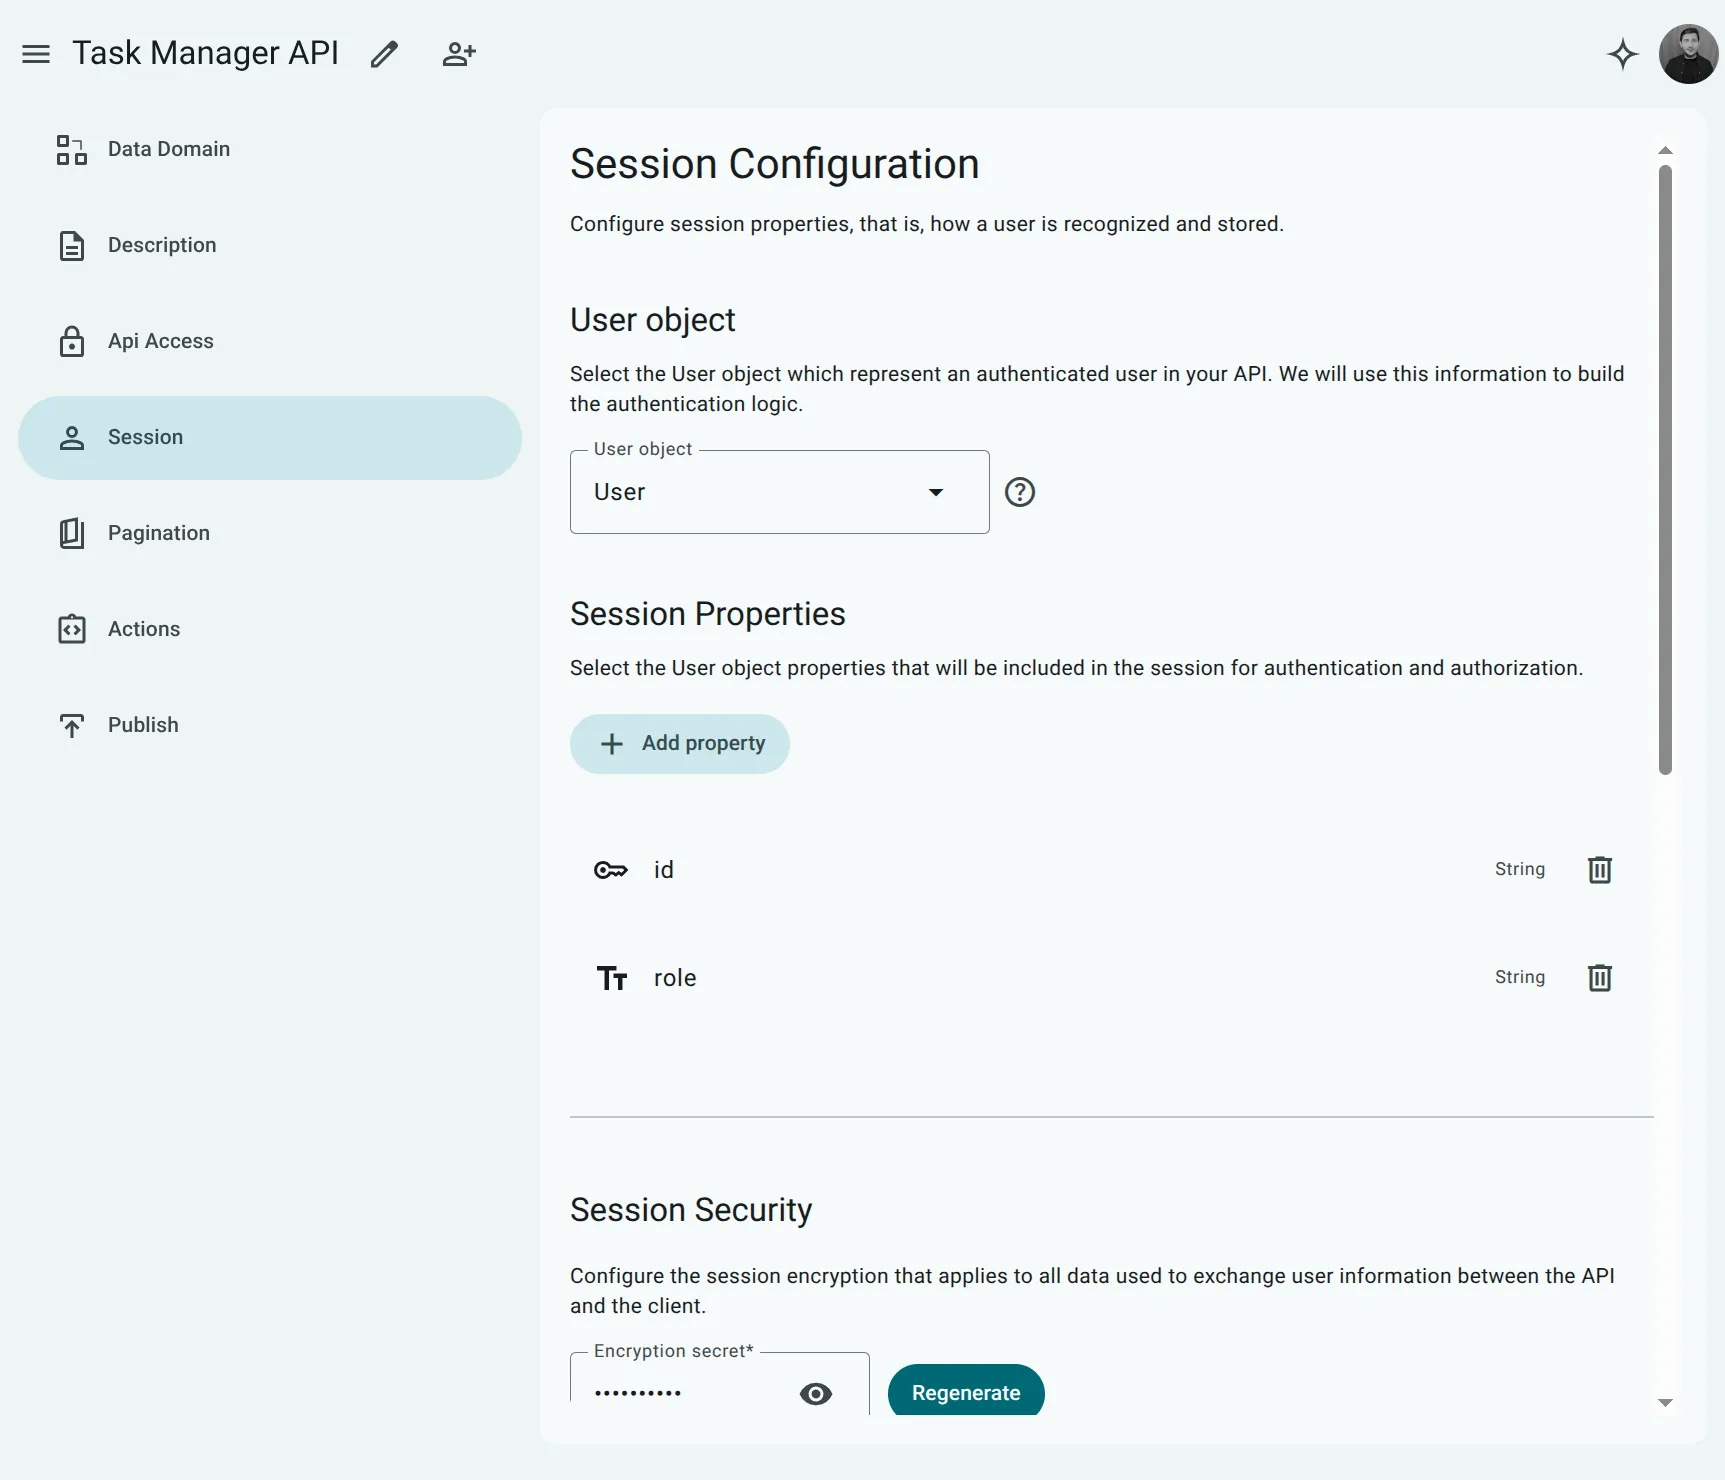
Section titled “5. Review Session Configuration”- Click Session in the left navigation sidebar.
- Under User object,
Useris automatically detected and selected. - Under Session Properties,
idandroleare preselected automatically from your entity semantics. - Keep the default Session Security encryption secret and settings.
6. Set Pagination Defaults
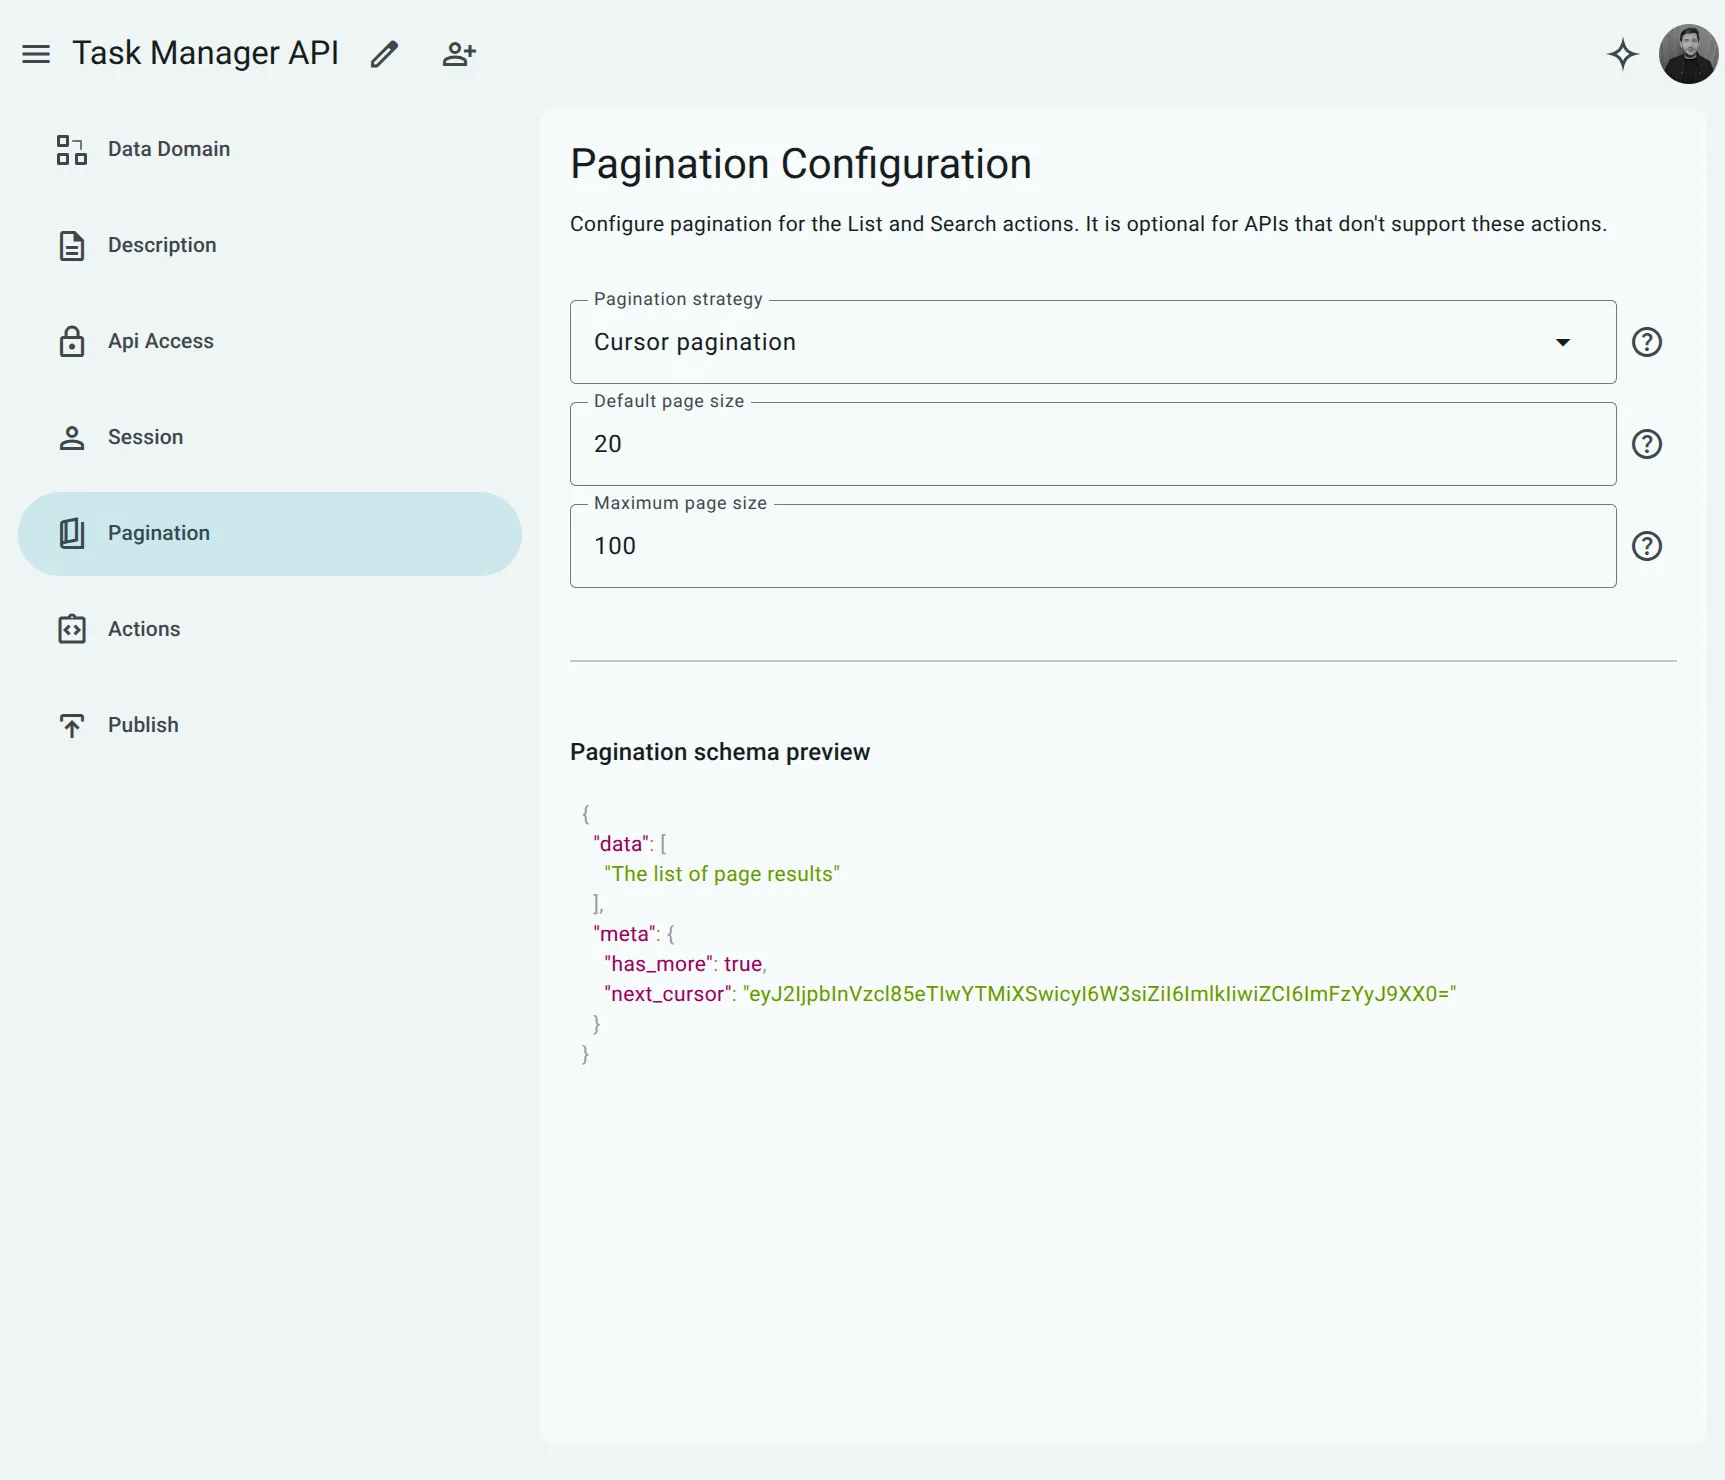
Section titled “6. Set Pagination Defaults”- Click Pagination in the left navigation sidebar.
- Keep the default Cursor pagination strategy (Default page size:
20, Maximum page size:100).
7. Expose Entity Actions
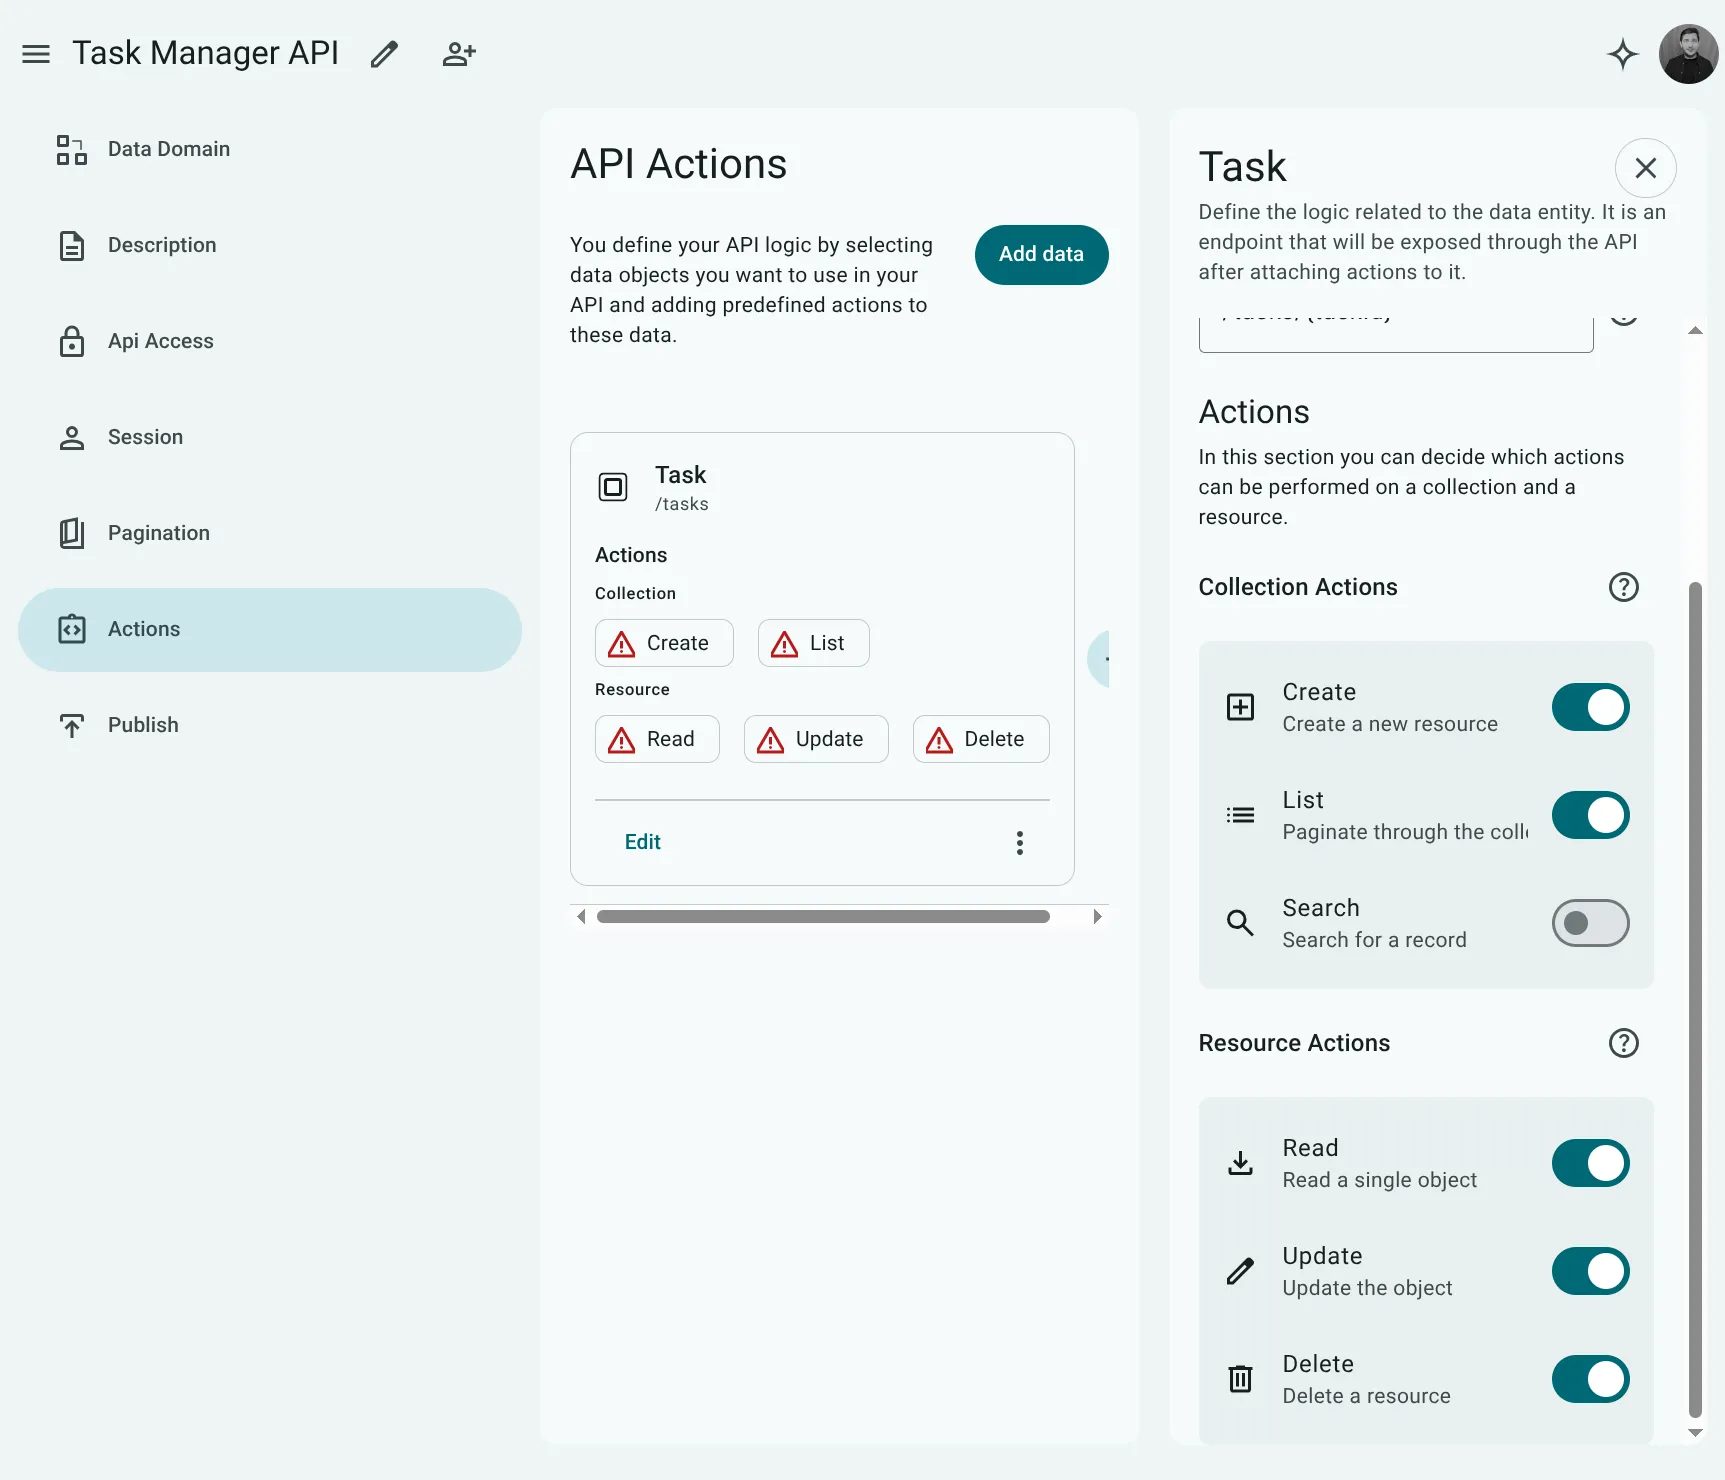
Section titled “7. Expose Entity Actions”- Click Actions in the left navigation sidebar.
- Click the Add data button to expose a root entity.
- In the dialog, select the Task entity. A new Task card appears on the visual modeling canvas.
- Click the Edit button on the Task card to open the configuration panel on the right.
- Enable all CRUD actions:
- Collection Actions: Toggle on Create and List.
- Resource Actions: Toggle on Read, Update, and Delete.
8. Configure Access Scenarios
Section titled “8. Configure Access Scenarios”Now let’s secure our endpoints with access rules:
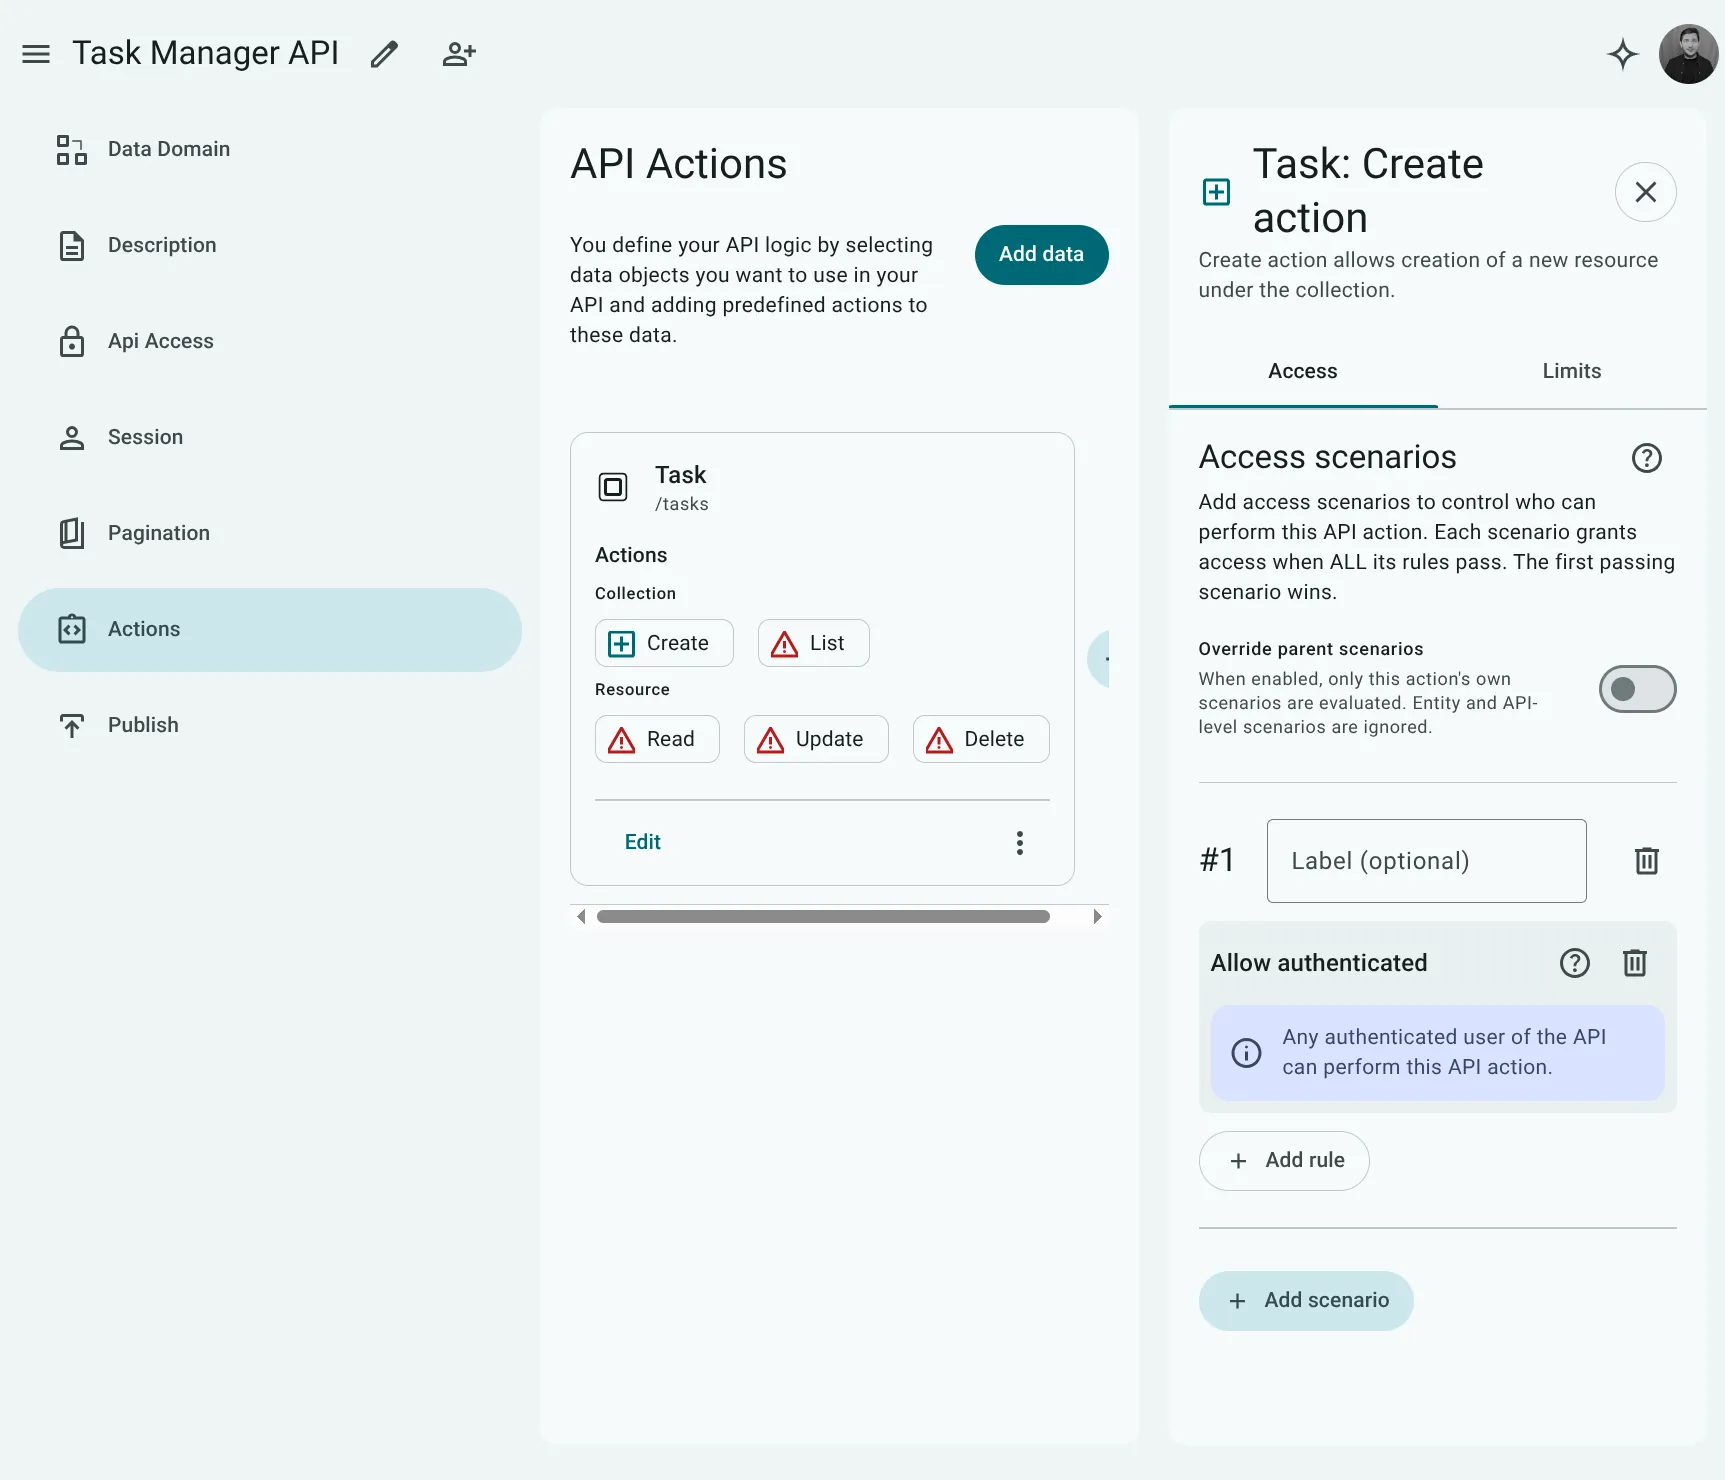
- On the Task card, click the Create action badge. The right side panel switches to the Task: Create action view on the Access tab.
- Under Access scenarios, click + Add scenario (this creates #1 Scenario).
- Click + Add rule and choose
Allow authenticatedfrom the menu.
- Repeat this step for the remaining actions (List, Read, Update, and Delete):
- Click the action on the Task card.
- Click + Add scenario.
- Click + Add rule and select
Allow authenticated(or configureAllow publicfor read actions). - Notice that the error indicators on all action badges disappear once an access scenario is assigned.
9. Deploy Your Live API
Section titled “9. Deploy Your Live API”Your API configuration is now complete! Let’s deploy it live to the serverless runtime:
- Click Publish in the left navigation sidebar.
- Click the Start deployment button.
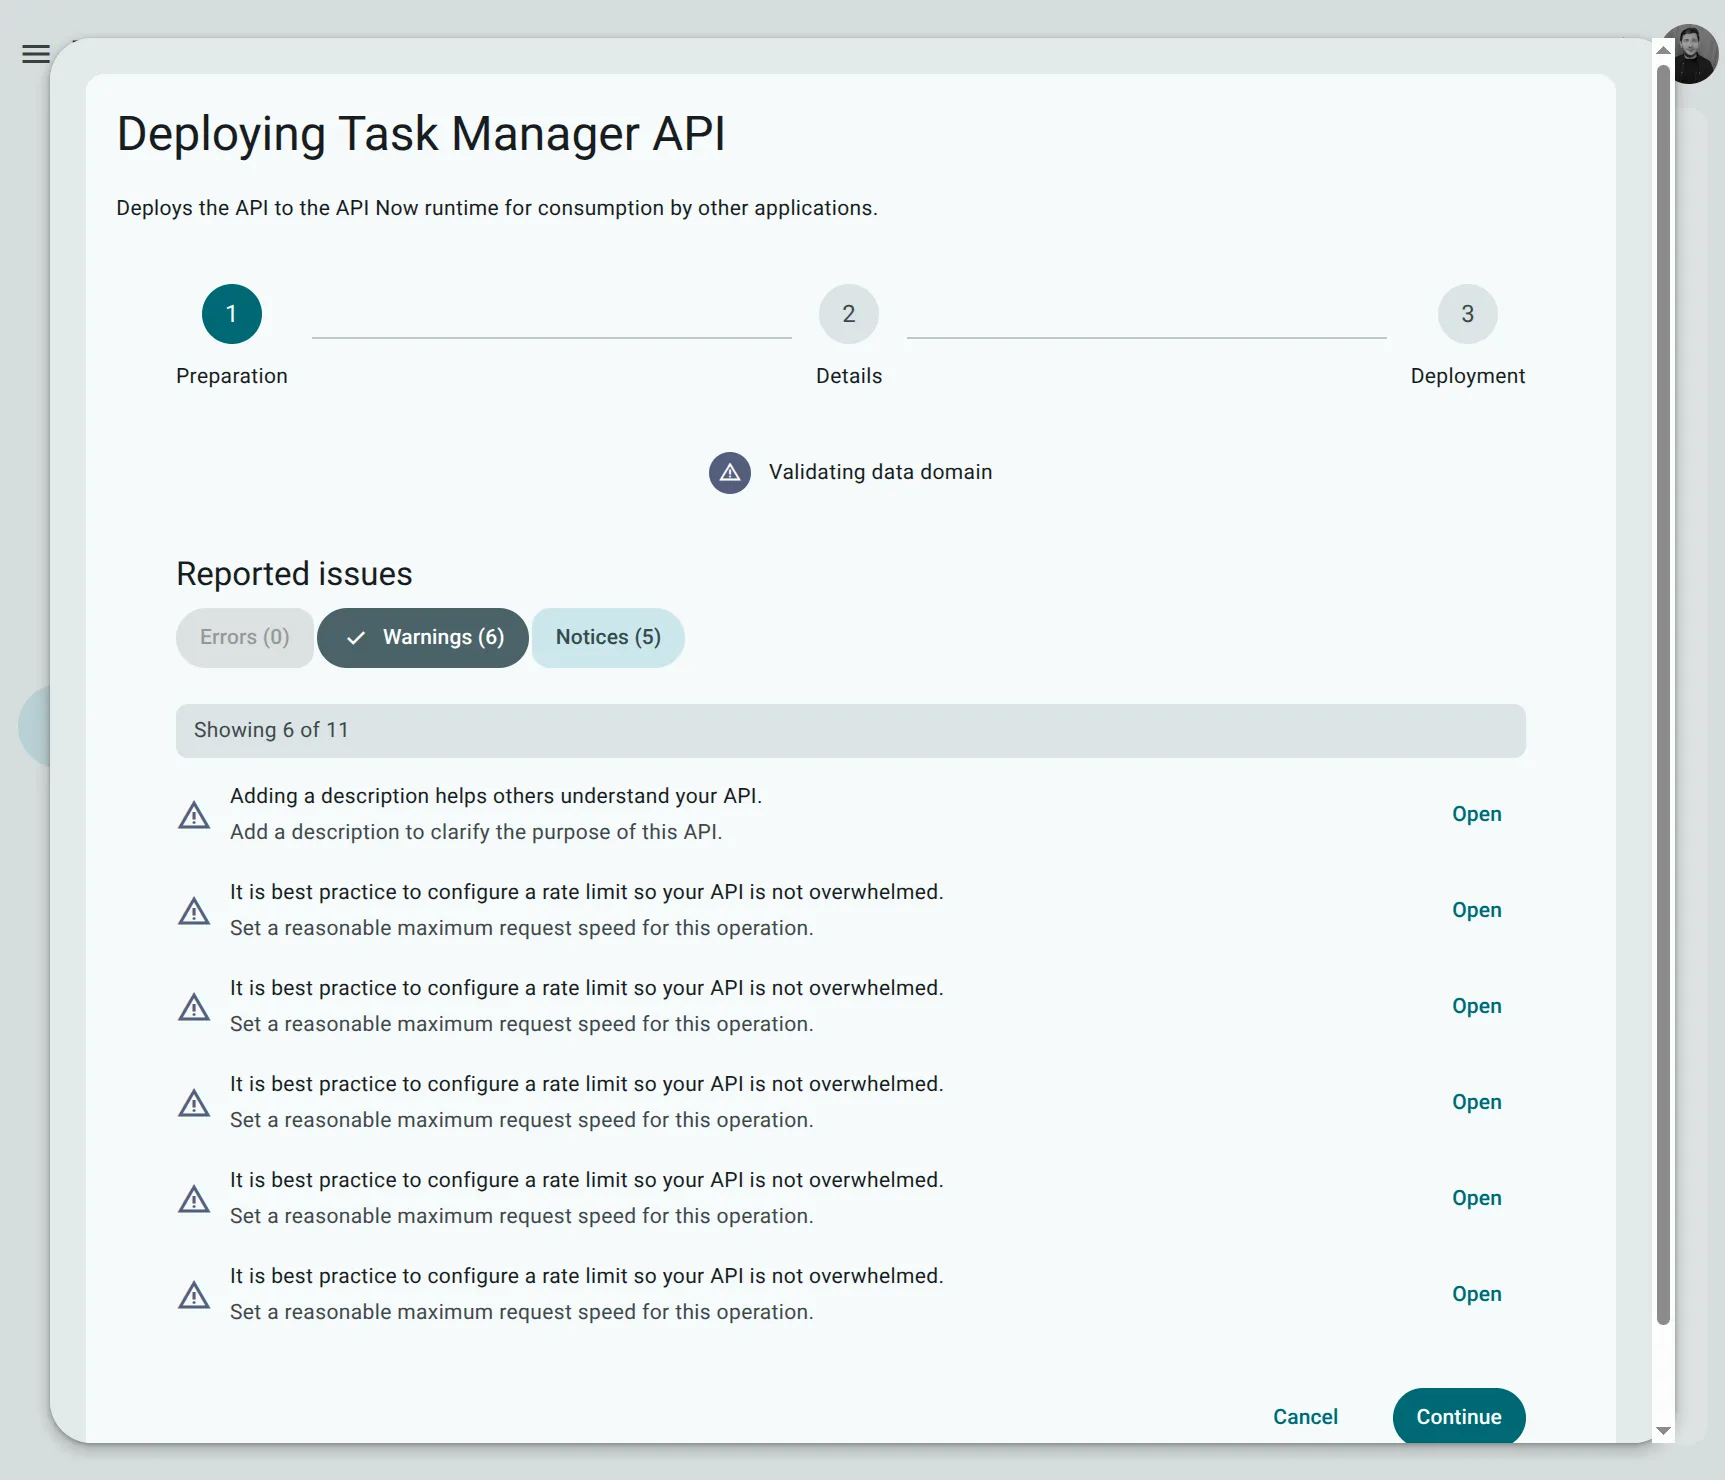
- Step 1: Preparation (Validation): A validation modal checks your configuration. Any warnings or notices (such as optional rate limiting suggestions) can be bypassed because there are zero errors. Click Continue.
- Step 2: Details: Leave the default environment as
productionand version asv1, then click Deploy. - Step 3: Deployment: The Serverless Runtime automatically provisions a dedicated PostgreSQL database, runs all schema migrations, creates indexes, and launches your live REST endpoints (this takes about a minute).
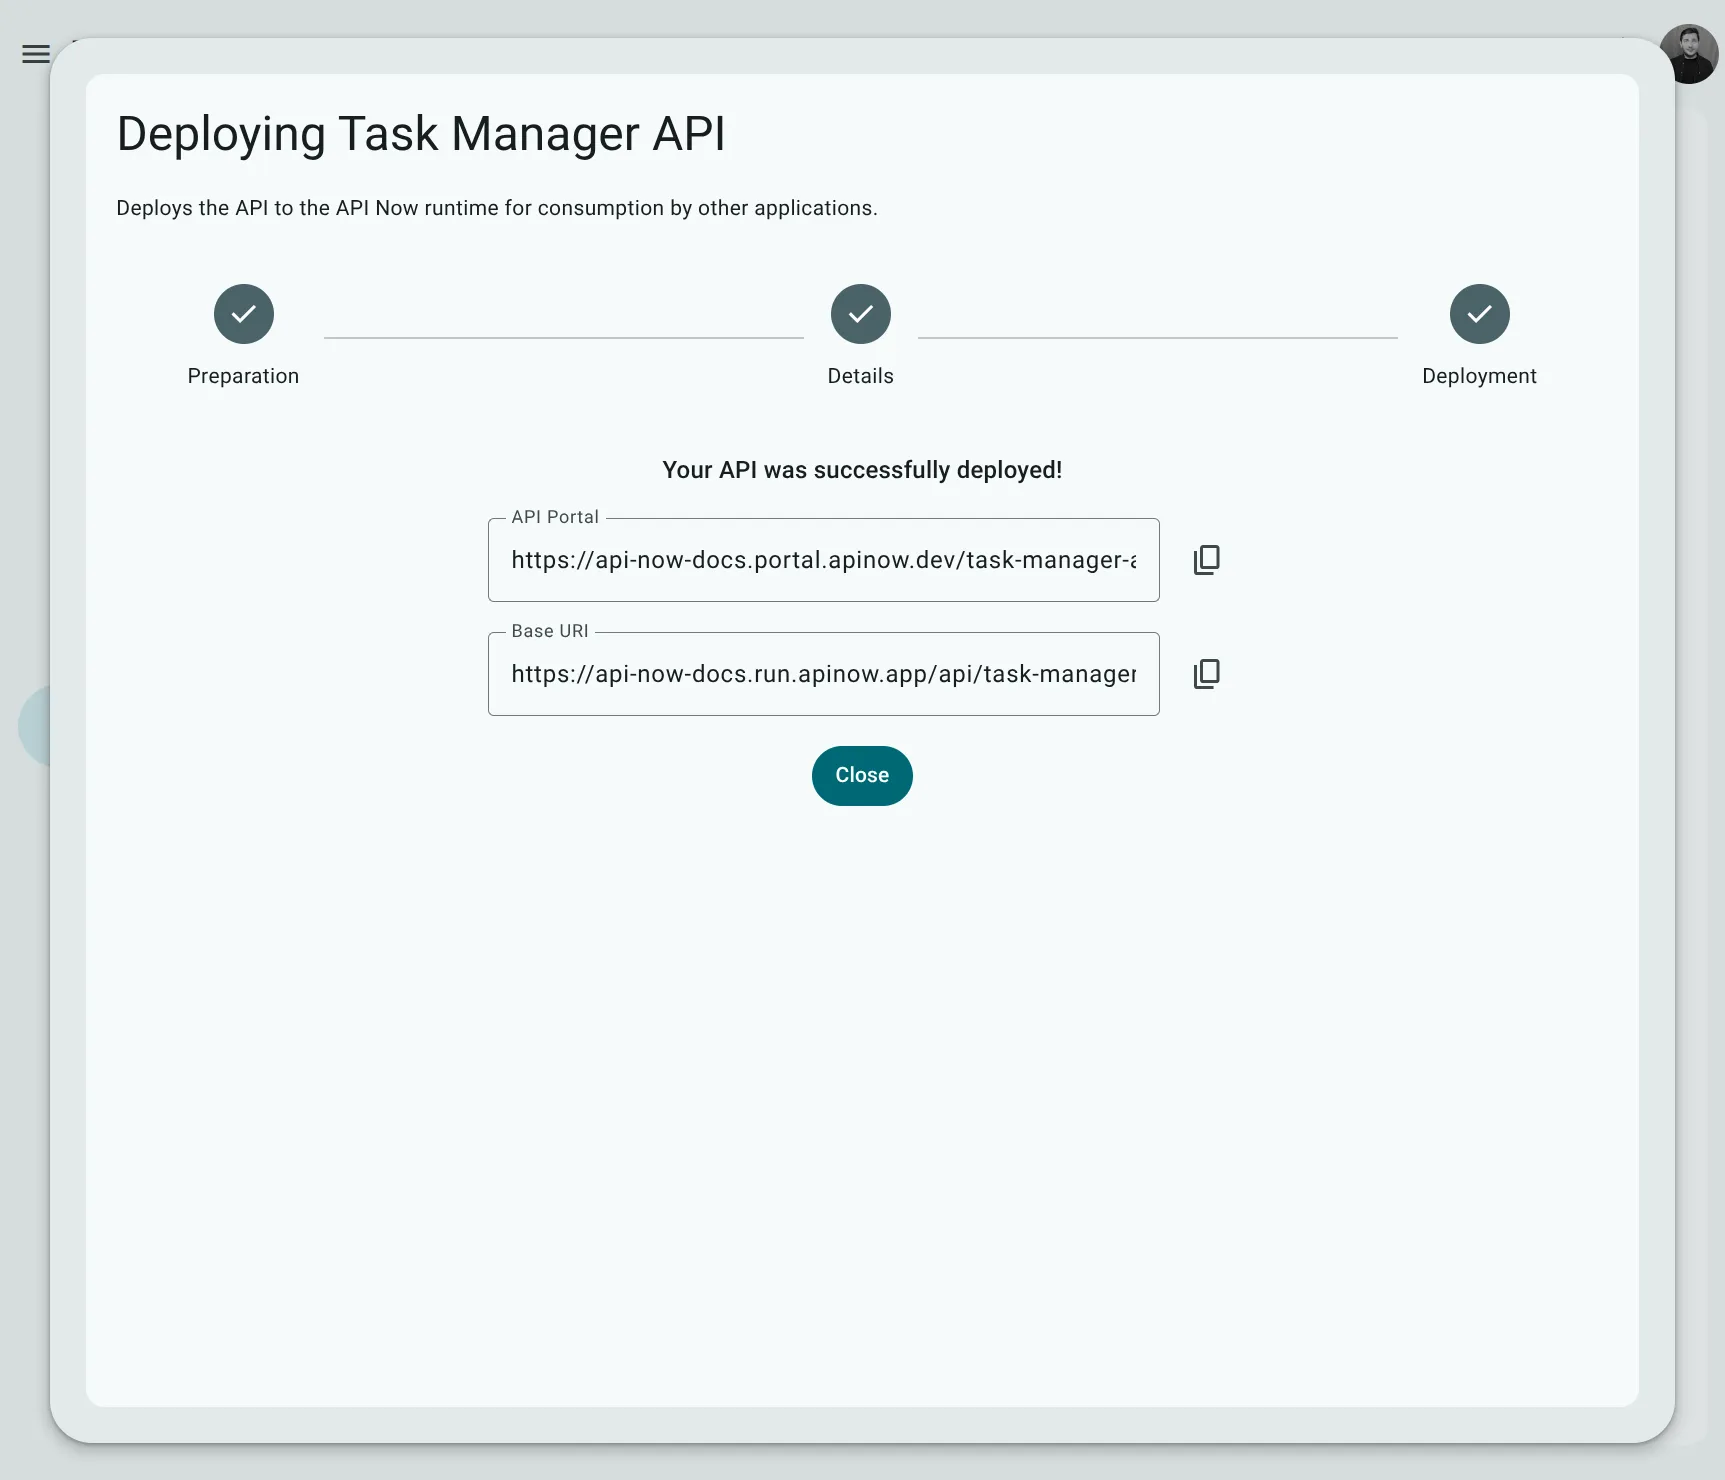
- Confirmation Screen: Once deployed, you will receive confirmation with two critical live endpoints:
- API Portal: Interactive web documentation and sandbox where you can test every endpoint directly in your browser.
- Base URI: Your live REST API base URL (e.g.,
https://<your-org-slug>.run.apinow.app/api/<your-api-name>/v1).
Step 3: Test & Call Your Live API
Section titled “Step 3: Test & Call Your Live API”Every deployed API in API Now! comes with an interactive, auto-generated API Portal where you can explore endpoints, inspect request and response schemas, and execute live API calls right from your browser.
Since our Task actions require an authenticated user session, let’s register an account, log in to retrieve a session token, create a task, and view the task list!
1. Open the API Portal & Create an Account
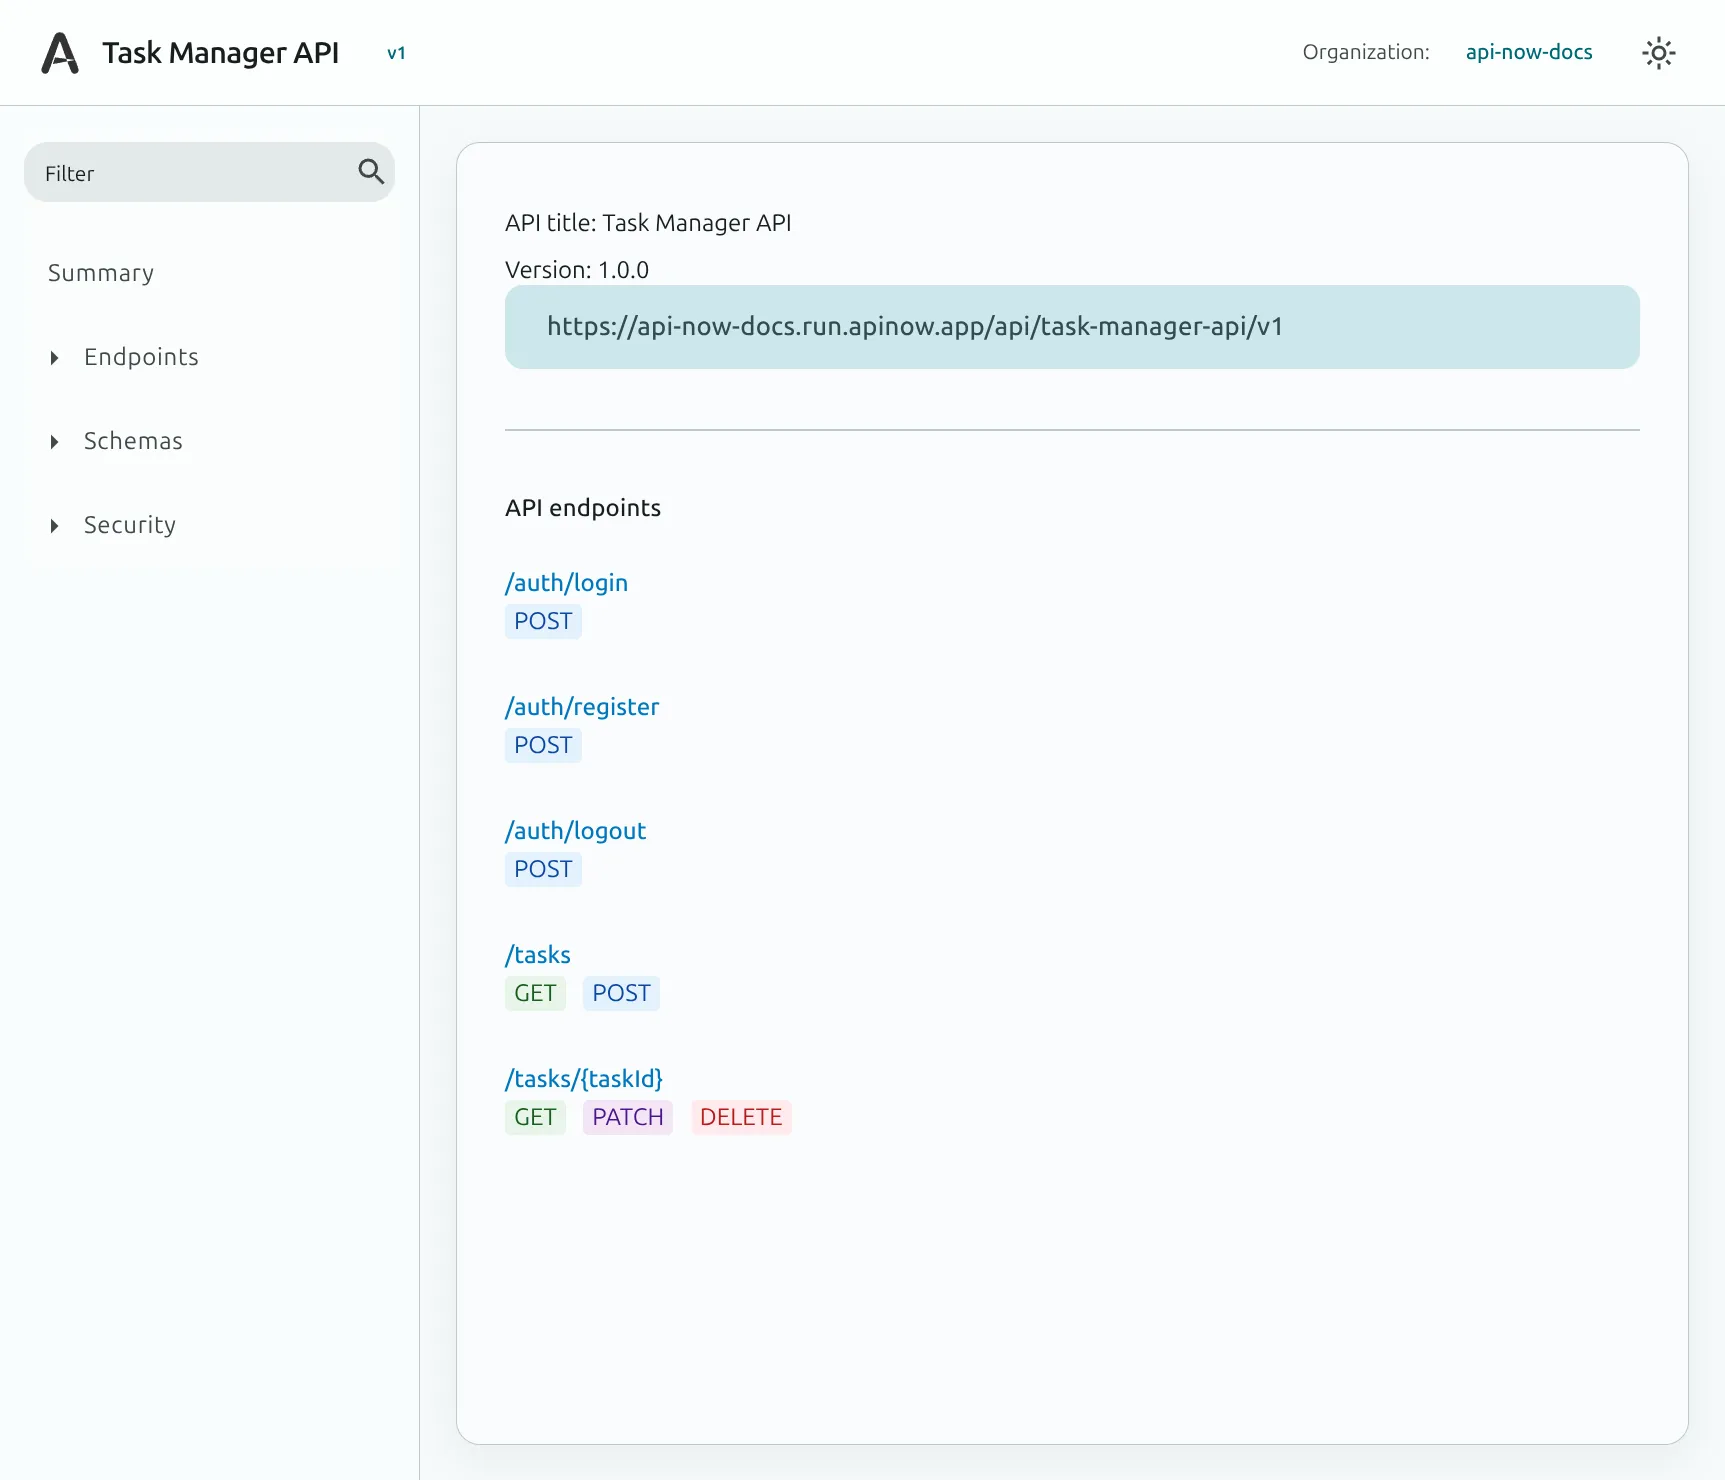
Section titled “1. Open the API Portal & Create an Account”- From the deployment confirmation screen, click the API Portal link (or open the provided URL).
- The portal overview displays your API summary and all auto-generated endpoints.
- Under the Endpoints menu on the left, click
/auth/register(POST auth_register). The/authendpoints are fully managed by API Now! based on your identity semantics. - In the interactive request editor on the right:
- Enter your registration credentials in the Body editor:
{"email": "my-email@fake.com","password": "very-hard-to-guess"}
- Click Send.
- Enter your registration credentials in the Body editor:
- You will see a
200 OKresponse returning your new user record:
{ "data": { "id": "tfgCQaLoeqy6Sbpuo8OSG", "email": "my-email@fake.com", "role": "member" }}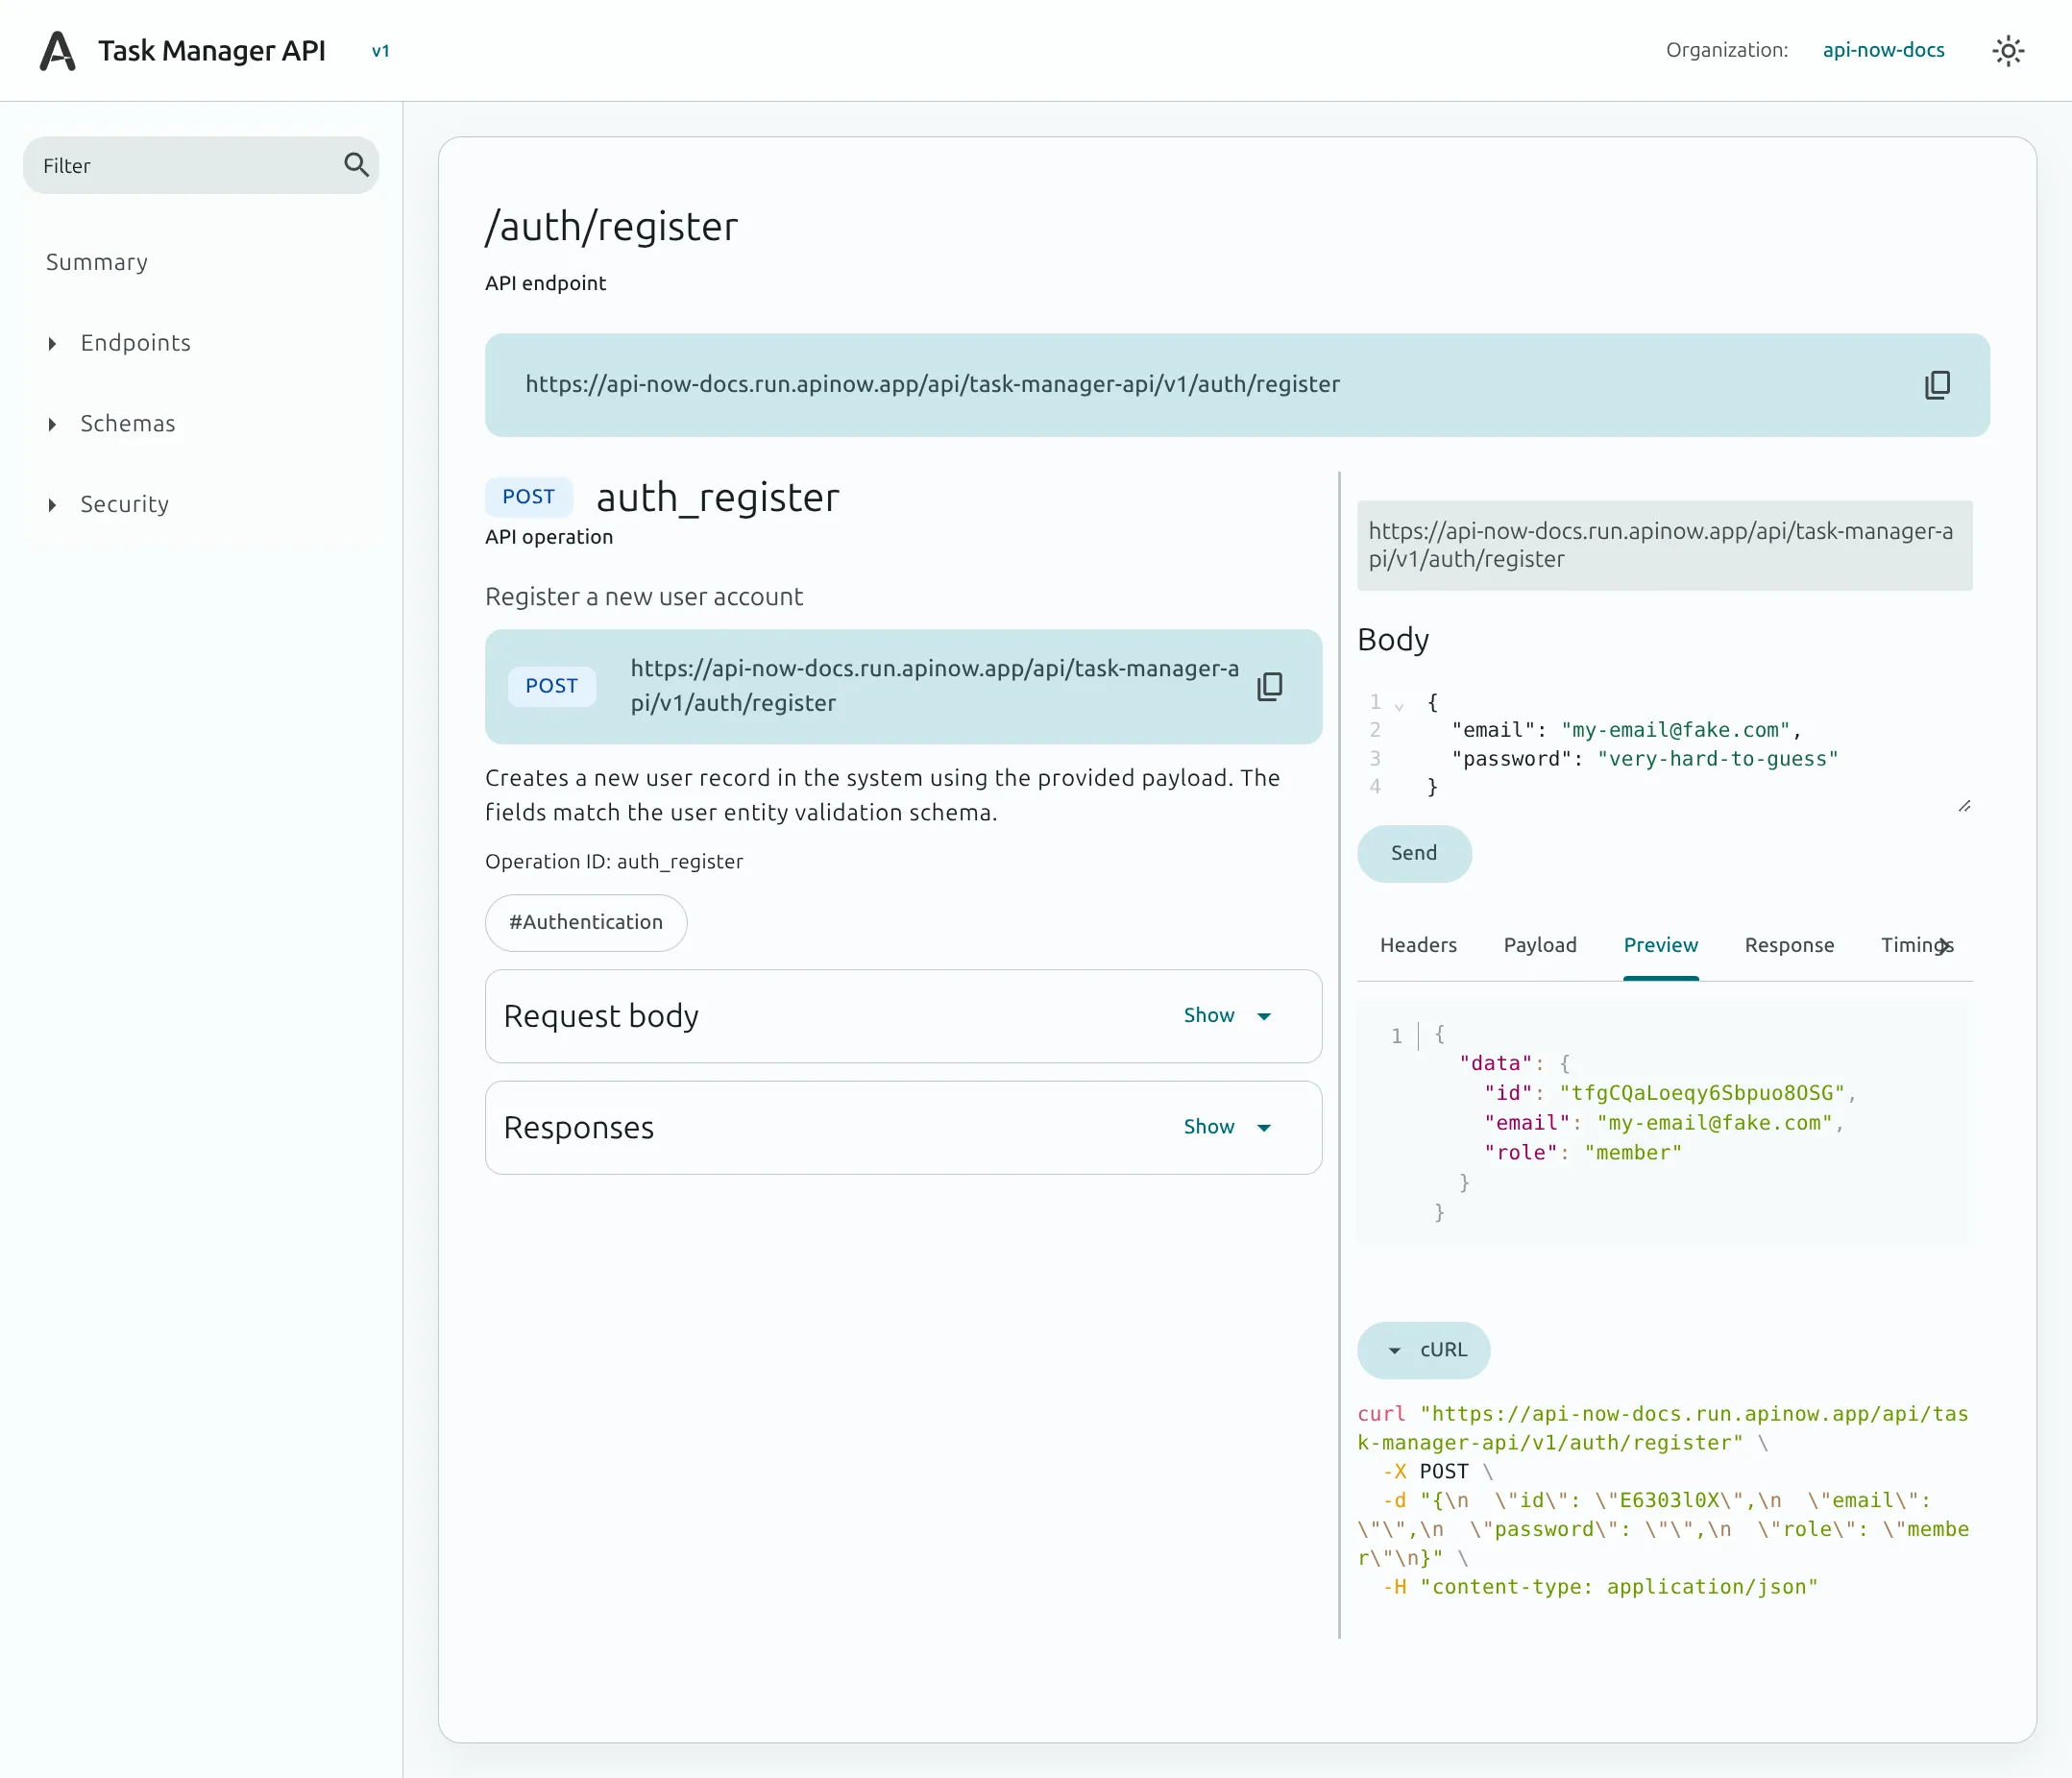
2. Log in and Retrieve Your Session Token
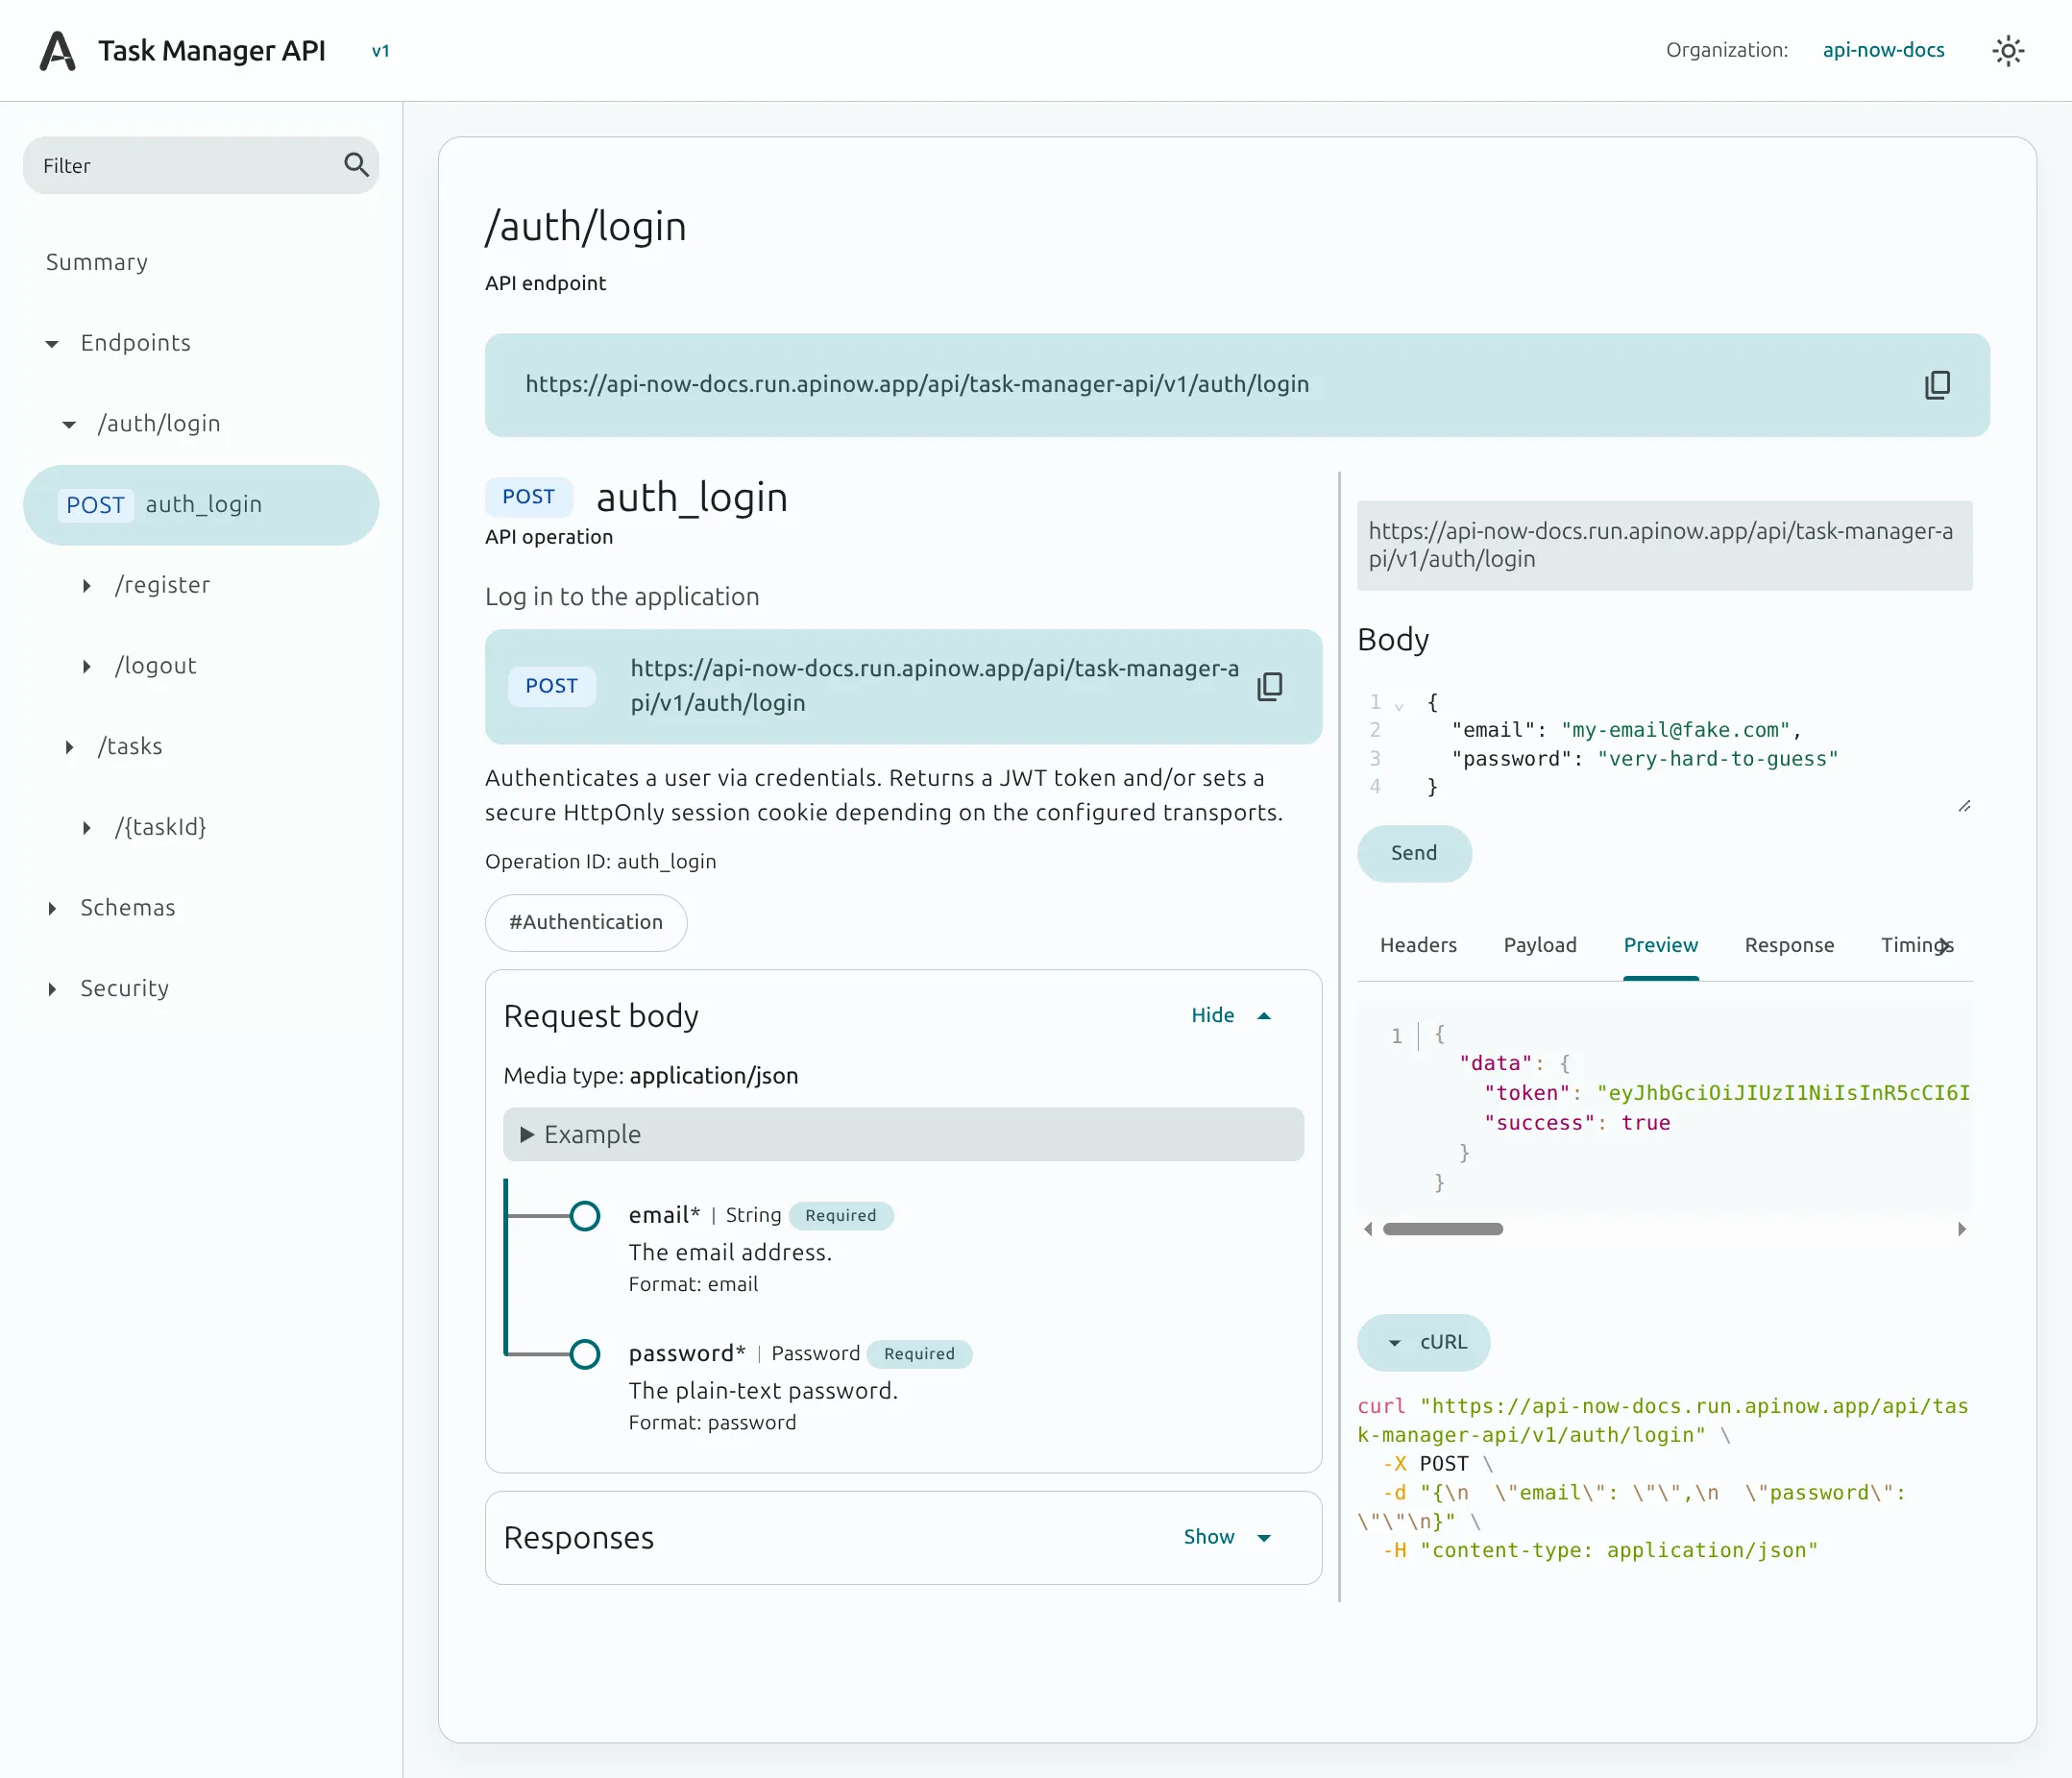
Section titled “2. Log in and Retrieve Your Session Token”- In the left navigation, select
/auth/login(POST auth_login). - In the Body editor, enter your registered credentials:
{"email": "my-email@fake.com","password": "very-hard-to-guess"}
- Click Send.
- The response returns
"success": trueand a signed JWT session token underdata.token:
{ "data": { "token": "eyJhbGciOiJIUzI1NiIsInR5cCI6IkpXVCJ9...", "success": true }}- Copy the generated
tokenstring—you will use it to authenticate subsequent requests.
3. Create a Task (POST /tasks)
Section titled “3. Create a Task (POST /tasks)”- In the left navigation, select
/tasks(POST create_task). - In the Body editor, enter the task payload:
{"title": "Launch Beta Product"}
- Scroll to the Credentials section:
- Set the Authorization method to
BearerAuth. - Paste the JWT token from the previous step into the Token value* field.
- Set the Authorization method to
- Click Send.
- Your task is created instantly!
{ "data": { "id": "2_3WlU59uXH6SNdki4V0g", "title": "Launch Beta Product", "slug": "launch-beta-product", "status": "pending", "author": "tfgCQaLoeqy6Sbpuo8OSG" }}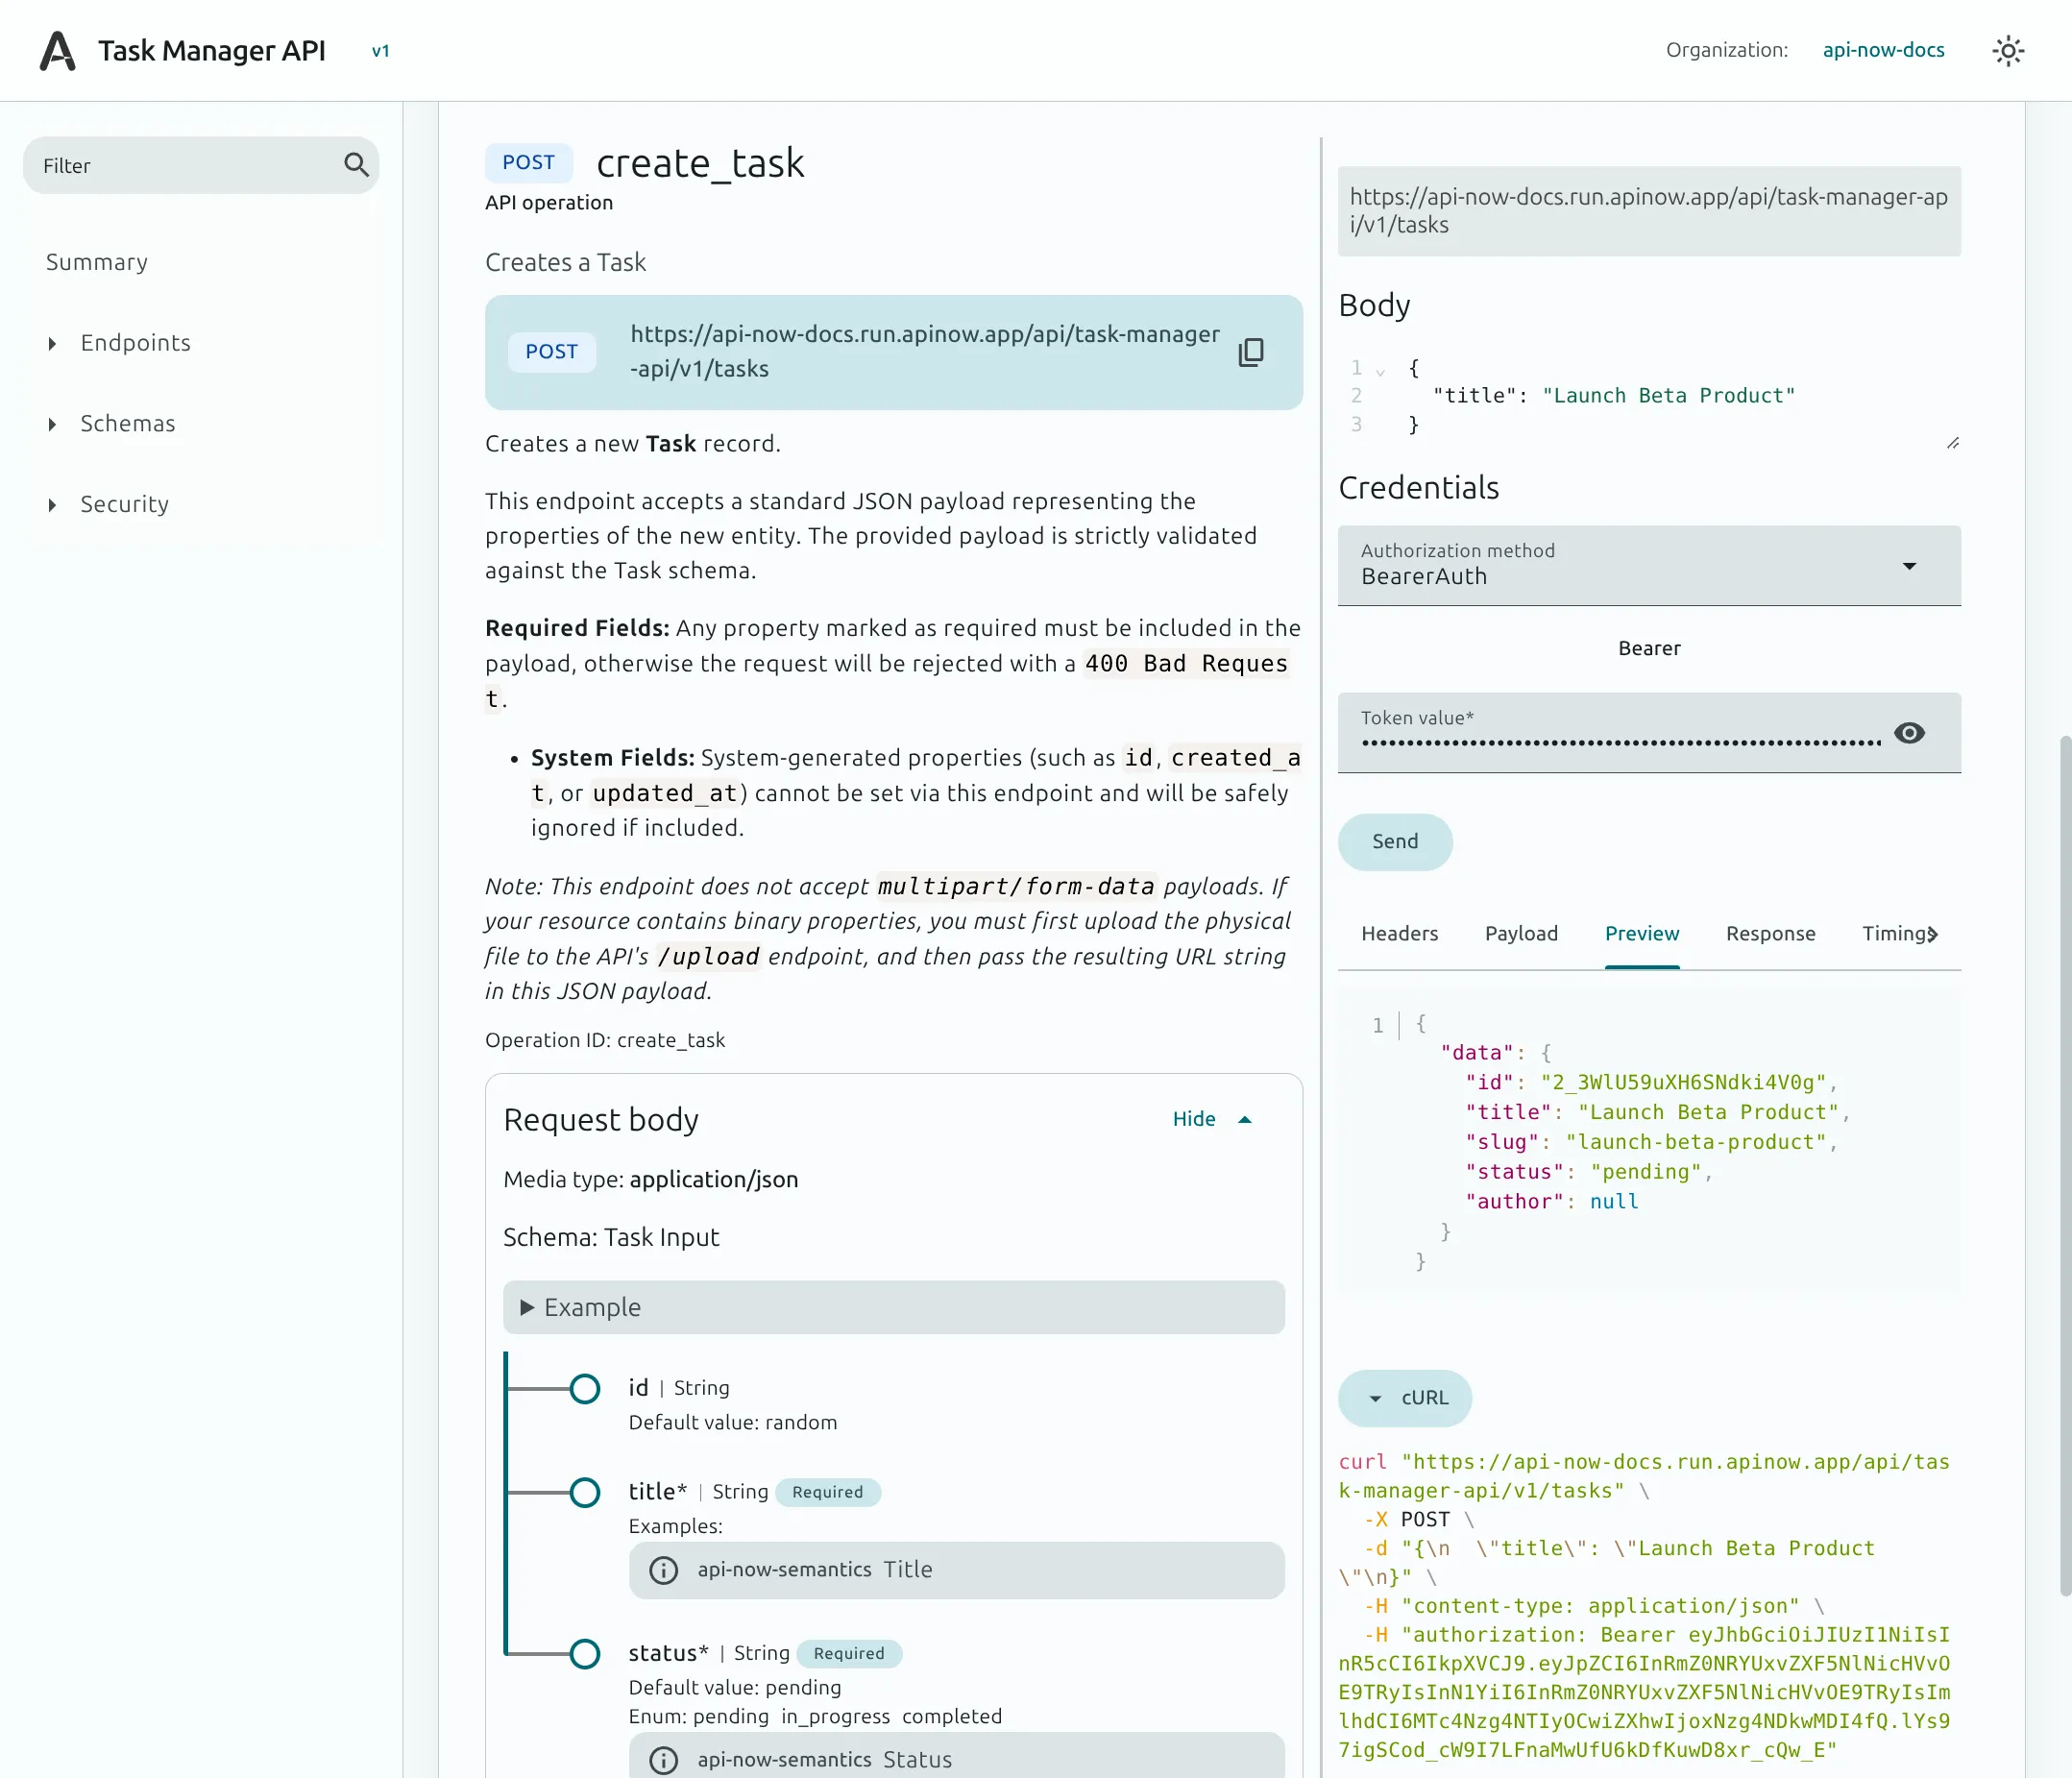
4. List Tasks (GET /tasks)
Section titled “4. List Tasks (GET /tasks)”- In the left navigation, select
/tasks(GET list_task). - Click Send to execute the query.
- The response returns your list of tasks along with cursor-based pagination metadata:
{ "data": [ { "id": "2_3WlU59uXH6SNdki4V0g", "title": "Launch Beta Product", "slug": "launch-beta-product", "status": "pending", "author": "tfgCQaLoeqy6Sbpuo8OSG" } ], "meta": { "next_cursor": null, "has_more": false }}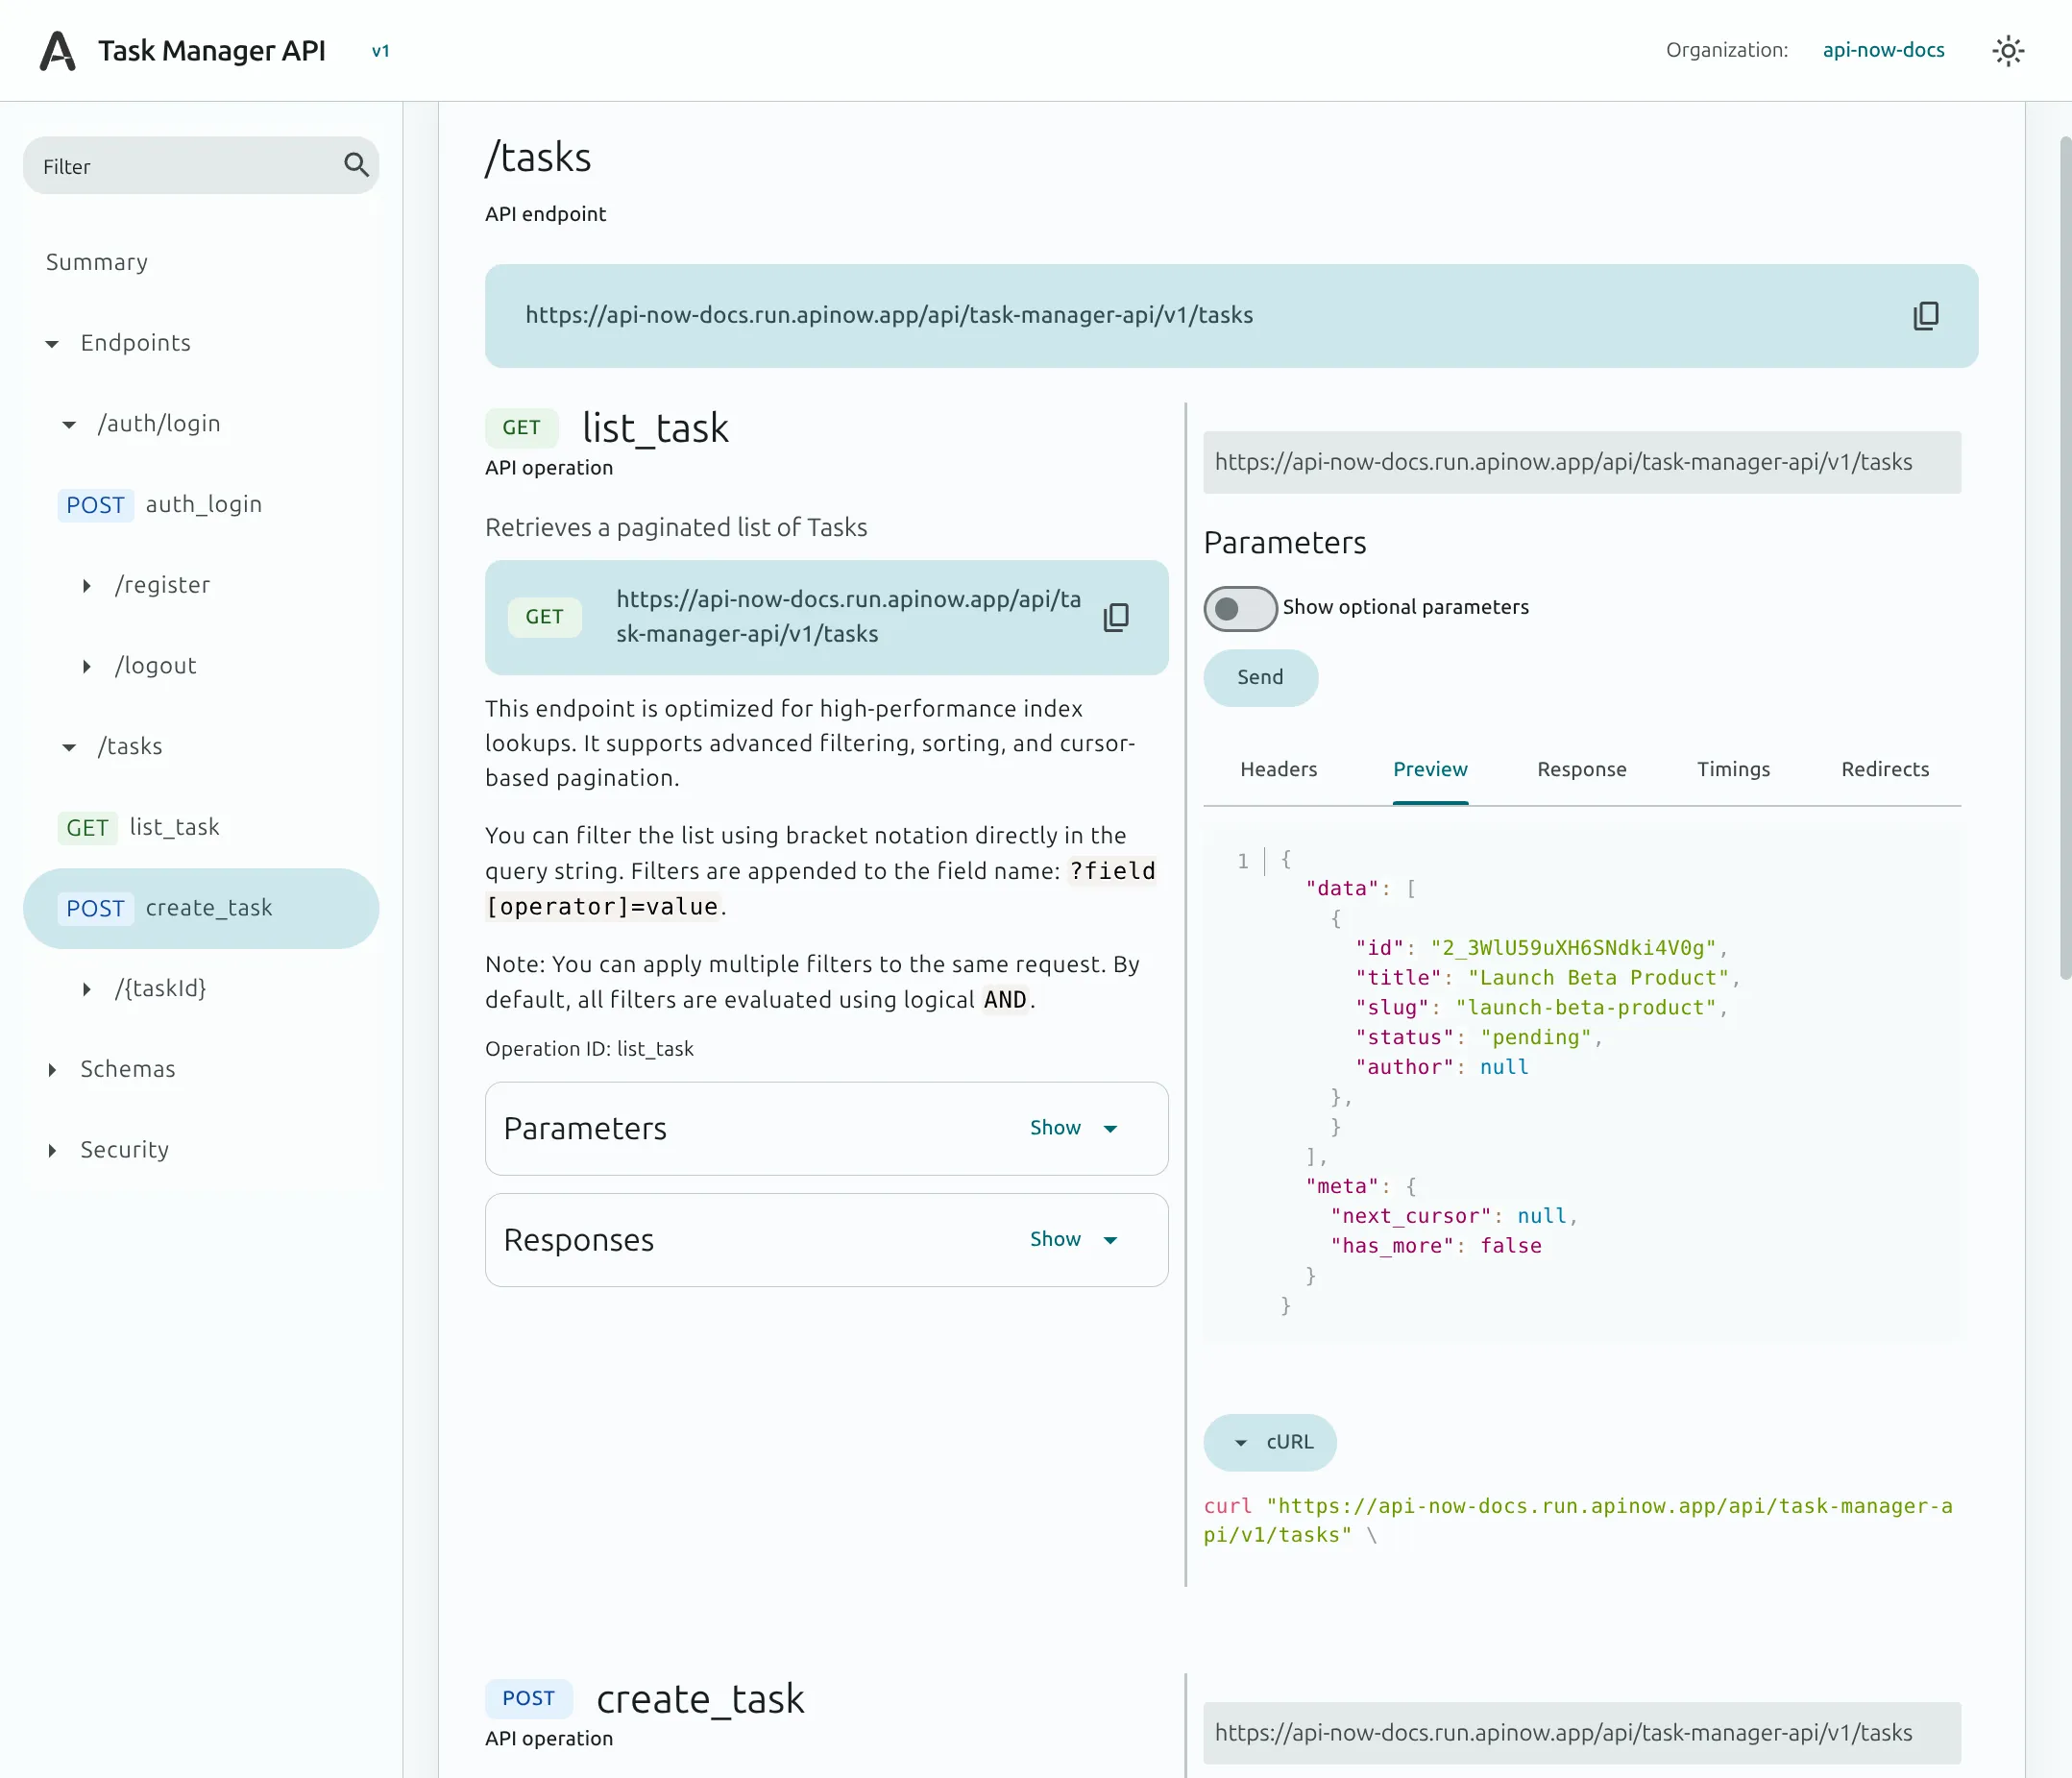
Calling Your API via Code or cURL
Section titled “Calling Your API via Code or cURL”You can also make requests directly from your terminal or application code using your live Base URI:
curl -X POST https://<your-org-slug>.run.apinow.app/api/<your-api-name>/v1/tasks \ -H "Content-Type: application/json" \ -H "Authorization: Bearer <your_session_jwt>" \ -d '{ "title": "Launch Beta Product" }'What Just Happened?
Section titled “What Just Happened?”In under 5 minutes, you accomplished what traditionally takes weeks of backend infrastructure work:
- Relational Database Generated: A dedicated PostgreSQL schema was provisioned with foreign keys, unique constraints, and optimized indexes.
- Identity & RBAC Enforced: User authentication with secure password hashing and session tokens was established out of the box.
- Data Ownership & Logic Automated: The runtime automatically manages slug generation, status state enums, and ownership tracking without writing backend code.
- Production-Ready & Documented: Your API is globally distributed, protected with standard error formats (RFC 9457), and complete with an interactive API Portal.
Where to Go Next
Section titled “Where to Go Next”- Open API Now Workspace: Jump into the web platform and start designing your next data domain.
- Visit apinow.app: Learn more about platform capabilities, updates, and upcoming features.
- Connect to No-Code Frontends: Connect your live API to Bubble, FlutterFlow, Webflow, or Zapier.
- Explore Authorization Rules: Discover multi-tenant organizations, lifecycle matching, and email domain gating.
- Browse the Data Catalog: Import pre-built data blueprints with one click.
- Semantic Modules Reference: Explore all built-in Data Semantics for e-commerce, auditing, location, and formulas.